Annotations: User Operations
This document provides a quick overview on the main operations you can perform about annotations. See the documentation of the related commands for further details.
Adding an Annotation
Here is a short description of how to create a new annotation. For details, see Creating a new Annotation.
- Right-click in the Annotation Tree Panel and select New Annotation
- Select a type. The Insert drop-down list is defaulted to the Text type. If the From file option is selected from the drop-down list, a file load dialog box is displayed allowing the user to attach an external file to the annotation. For instance, a Microsoft® Excel or Microsoft® Word file might be selected. When the note is expanded, a dialog box will display the referenced document. Finally, if you select the From Internet option, in order to associate a URL, the Insert from Internet dialog box is displayed, enabling you to enter the desired URL string. The Address box is also a drop-down list containing all of the URLs most recently typed into this dialog, so that reusing URLs is very simple.
- Select the Category which the new annotation will belong to (if you select New Category, you will have to enter the new category name in the Name box).
- To associate keywords with the new annotations, type the keywords, separated by a comma, in the Keywords box.
- In the Point of Interest drop-down list, select Point on face if you want to attach your annotation to a point on a face of a solid, or select Snap point to select a special point, which can be a vertex on a solid, center, end, or mid point on an edge, a point on the corners of an associative surface, a point on profile geometry. Then select a point according to the chosen type. See also Point of Interest in the Glossary.
- If the chosen type is From file or From Internet, the default label is the name of the selected file/URL. You can change it as you please. If the chosen type is Text, the label is the first line of the text you typed in.
Editing an Annotation
To edit an annotation you can do one of the following (see Modify Annotation):
- Double-click on an annotation
- Select the Modify Entity command in the context menu either on top of the annotation entity or in the annotation tree
- Use the Modify
 Annotation command
The edit command will display the same selection list, as did the creation command. However, all of the values will be preset with the current data values of the annotation being edited. The annotation label box becomes modified in color as well as function. While in the edit command, the label text can be typed directly in the annotation.
Expanding an Annotation
Through the context menu or by double-clicking, it is possible to expand an annotation (see Expanded Mode in the glossary).
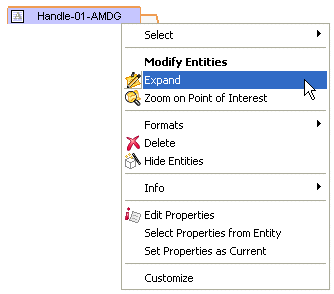
To start the command, right-click on the annotation label and select Expand in the context menu. If the annotation is of the Text type (see New Annotation), a dialog box displaying the associated text will be displayed.
If the annotation type is From file (i.e.: there is an attached external file), a dialog box displaying that file will show up.
In order to return the annotation to its simplified state, just close the expanded dialog. The annotation type dictates the interfaces used to interact with the expanded mode dialog. Like the simplified visibility mode, the leader line maintains connectivity of the dialog with the point of interest.
Reading the Properties of an Annotation
The Properties command is also available in the context menu when right-clicking on an annotation. A specific Annotation category is also available in the Entity Properties dialog box, displaying information on the annotation. In particular, it will display the files being referenced, category and keywords.
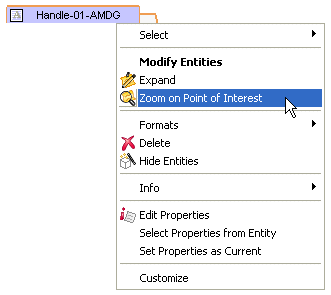
Zooming on the Point of Interest of an Annotation
A specific command (Zoom on Point of Interest) is provided to enable the user to select an annotation and zoom in on its point of interest, very useful to understand where an Annotation is attached, especially in complex models.
You can start the command either from the ViewModify menu, or by right-clicking on the annotation and selecting Zoom on Point of Interest in the context menu.
When the command is started:
- The view is panned to center on the point of interest.
- The zoom viewing factor (see Zoom factor in the View category of System Options) is applied, providing a closer look at the point at which the annotation is attached.
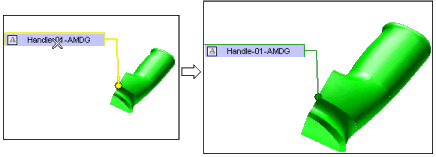
Because the annotations are dynamic, it will reposition itself to remain visible even after modifying the view.
Related Topics
 e-Learning on Annotations