Annotations: the User Interface
To provide basic information about the Annotation User interface, we will focus on:
The Annotation Tree Panel
An overview of a model's annotation data may be viewed and controlled from its own tabbed, tree control page located in the same side panel as the Model Structure.
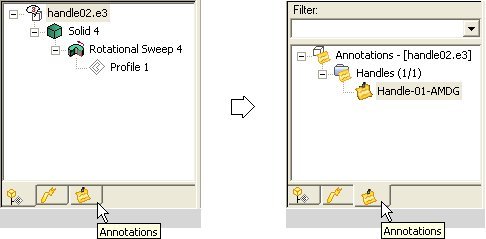
The tree panel is a tabbed page that can be accessed in the same side panel as the Model Structure. Select the tab with the note icon and the annotation tree will appear. The top node of the tree hierarchy is the
Annotations node. In brackets to the right of this node title informs the user of what level of the assembly the annotations are from. For instance, “Annotations [component_name]” indicates that the collection of annotations displayed in the tree is contained by the component_name component. Annotations are inserted and grouped at that component level. The component that is current at the time of creation is where the annotation will be inserted.
Under this node the annotations are organized by user assigned categories and then by the actual nodes themselves. The annotation nodes are identified or named by the user-defined text displayed in their label format.
Changing the category of an annotation
Please note that you can move an annotation to a different category just by dragging & dropping the corresponding icon in the tree from the category where the annotation belongs to the new one you want it to belong to. |
The tree presents several options of control to the user:
- A context menu is provided allowing addition of new categories and annotations, along with editing or redefinition and deletion of the annotations.
Right-clicking on a category node
When right-clicking on a category node, the context menu provides the following commands:
New Annotation
to create a new note
Hide/
Unhide
to change the visibility of the selected item
Delete
to remove the selected note or category of notes
Rename
to change the name of a category in the tree
|
 |
Right-clicking on an annotation item
When right-clicking on an annotation item, the context menu provides the following commands:
Right-clicking on an empty area
If the mouse is not over an item, the provided commands are the following:
New Annotation
to create a new note
Reload Tree
to refresh the tree by regenerating its contents
Filter Options
to define the options for the tree search Filter. A dialog box containing all of the filter options is displayed.
to display standard Options dialog box.
|
 |
- Double-clicking on the corresponding tree item icon will toggle visibility of an annotation (exactly as right-clicking and selecting Hide in the context menu). If the user double-clicks on the icon of a category or the main node then the visibility of all of its children will be modified to match the presently toggled visibility mode of the clicked item. The icon of a hidden item will appear grayed out.
- The Filter box above the tree can be used to input Boolean search strings to search for, hide, and show annotations. See
Annotations:
Filter and
Filter Options for details.
- Also displayed in the tree control is the visibility status. This information appears as a fraction located on the right side of the category labels. This fraction represents the number of annotations displayed over the total number of annotations in the category.
The Annotation Creation/Editing Selection List
The selection list for the New Annotation command (and also for the
command) displays the following items (see also Creating a
New Annotation):
- Point of Interest
The point on the model to which the annotation is attached. Depending on which item you select in the drop-down list, this point can be:
- If you select Point on face: any point on a face of a solid,
- If you select Snap point: A special point meeting the following restrictions.
-
- Point must refer to geometry that is owned by a history event
- Vertex on solid
- Point (center, end, or mid point) on edge
- Point on the corners of an associative surface
- Points on profile geometry.
- Insert
The type of the annotation refers to the expanded mode of the note. The simplest type of the annotation is the Text type. In expanded mode this opens a notepad allowing the user to type in multilined notes, and paste text from other documents such as emails. Another option available from the
Insert combo box is
From file. Selecting the
From file option will open a File Load dialog box. This will allow the user to select any type of file listed in the filter combo and attach it to the annotation. The annotation will display the selected external document in its expanded dialog form.
The last option (From Internet) enables you to specify a URL to be opened and viewed in the expanded annotation. Upon expanding the annotation, a web browser will appear in the expanded annotation’s frame and will load the page or document identified by the URL address, thus actually enabling you to open a web page from an annotation (which can be very useful: suppose a company’s ISO documents were contained in a Company intranet. This annotation would allow the engineer to quickly view the relevant ISO document with the annotation).
The URL browser Insert from Internet dialog box is provided to enter the desired URL string.
The Address box is also a drop-down list containing all of the URLs most recently typed into this dialog, so that reusing URLs is very simple.
- Category
The category is a string that is used to organize the annotations. The Category combo box allows the user to select an existing category to represent the annotation being defined. By selecting the
New category item from the list, an additional text box will show up in the selection list in which the user may type the name of the category. A default value is provided. However, the user is free to change the category string in this field.
- Keywords
Within this edit field the user may type several keywords separated by commas. These keywords allow the annotations to be searched for via a Boolean search string.
Interactive Annotation
During the creation and redefinition phase, the annotation takes on a more interactive format. In this format the user is able to add or edit the label text directly on the annotation.
Double-clicking on the annotation or right-clicking and selecting Expand in the context menu allows the user to expand the annotation (see Expanded Mode in the glossary; see also Expanding an Annotation in
Annotations: User Operations).
Related Topics
 e-Learning on Annotations