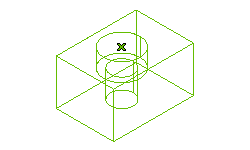
The couterbored hole created on a rectangular block of size 100*50*50 in wireframe view is show in the image below.

Proceed as follows to create the hole:
A counterbore hole is a stepped hole and has two diameters, a bigger diameter and a smaller diameter. The bigger diameter is called the counterbore diameter and the smaller diameter is called the hole diameter. This hole type requires you to specify two depths, counterbore depth and the hole depth. The counterbore depth is the depth up to which the bigger diameter will be defined. The hole depth is the total depth of the hole, including the counterbore depth.
The couterbored hole created on a rectangular block of size 100*50*50 in wireframe view is show in the image below.

Proceed as follows to create the hole:
 or
or  to confirm your selections and create the counterbored hole. Click
  to discard your changes.
| Note If the model is component you need to select the X-Components check box and the component for the Components selector from the selection list to create a hole. To reselect the components, right-click on Components to select Reset and then select the involved components. You cannot add fillets or chamfers while creating a hole through components. |