Creating Standard Shaped Holes on a Solid
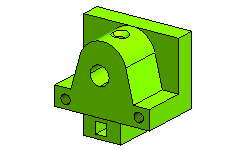
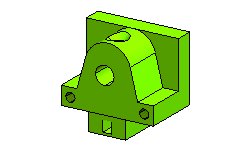
In this tutorial, you will create a standard countersunk hole and standard simple threaded holes on the fixture shown in the image below. To accomplish the task open the Standard_Thread.e3 file from the samples folder of the software installation and follow the steps given below.
- Start the Hole command to display the selection list. Ensure that the For screw check box is selected and the For screw node is expanded.
- Next, select Metric Coarse Pitch in the Standards: drop-down list, if it is not already selected. Select the CounterSunk option from the Hole type: drop-down list.
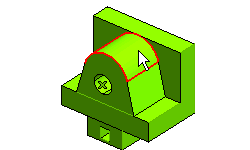
- Now, select the Blind option from the Extension drop-down list and select the surface of the model on which you need to create the standard countersunk hole, as show in the image below.
- On selecting the surface multiple mini-dialog boxes get displayed. Enter 10 in the Distance mini-dialog box, 30 in the Depth mini-dialog box, and -80 in the Angle mini-dialog box.
- Now, select M6 from the Designation drop-down list of the Hole selection list to define the diameter of the hole.
- Select
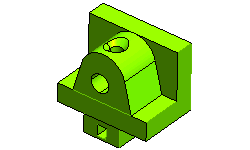
 to confirm your selections and create the countersunk hole, as shown in the image below.
Next you need to create the two standard threaded holes. To do so, proceed as follows:
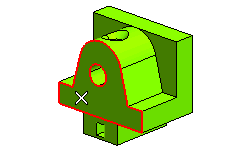
- Right-click on the Face selector from the selection list to select the Reset option from the context menu. Now, select the face of the model, as shown in the image below.
- Now, select the From 2 lines option from the Type drop-down list to position the center of the hole and select the Threaded option from the Hole type: drop-down list.
- Next, select M6 from the Designation drop-down list to define the size of the hole and select the Thru all option from the Extension drop-down list. The two mini-dialog boxes get displayed in the Graphics Area.
- Enter 5 and 45 in the 1st Distance and 2nd Distance mini-dialog boxes, respectively.
- Keep all other settings from the selection list as it is and select to confirm your selections to create the threaded hole.
- Similarly, create another threaded hole on the other side of the solid using the above mentioned standard values. Enter 5 in the 1st Distance and 2nd Distance mini-dialog boxes. The final solid will be displayed, as shown in the image below.
Note
By using the Hole command you are able to create threads only on Simple Hole. To create the threads on different shaped holes, you need to use the Thread command. |
Also try to..
Tips and Tricks