Creating Customized Tubing Catalog
The following illustration explains how to create customized tubing catalog that can be later used for inserting tubing elements in the network.
Before we proceed it is important for you to know the following:
- Index - It is the collector of catalogs in the tree structure of the Manager. See the Catalog Browser document for details.
- Catalog/Family - It is a table of values used by thinkparts and tubing to create the elements. The catalogs in the Lines index are a special Tubing case.
- Master model - It is a parametric 3D model to which the program applies the values chosen by the user from the catalog.
It is also recomended for you to read the An Overview of Tubing Customization document.
In this tutorial you will create a custom tubing catalog of welded tubes. Open the Tube_Welded.e3 file from the Samples folder of your think3 installation. This model will be used as the Master Model and will appear as shown below.
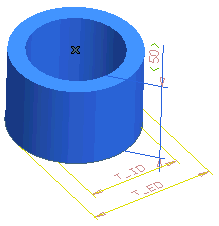
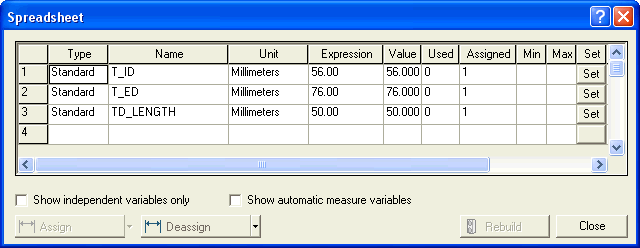
The model is a simple pipe with three driving dimensions (use Spreadsheet to check the assignment of the variables): TD_LENGTH (pipe length), T_ED (external diameter) and T_ID (internal diameter):
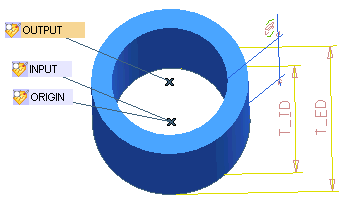
The model also has the following symbolic references that have been connected to a Datum Point in the center of the relevant face; use the View Symbolic References command to view them:
- ORIGIN - identifies the pipe insertion point
- INPUT - identifies the pipe starting point in order to give a direction to the pipe
- OUTPUT - identifies the pipe ending point
Now follow the steps given below to create a custom catalog.
- Start thinkteam
 thinkparts
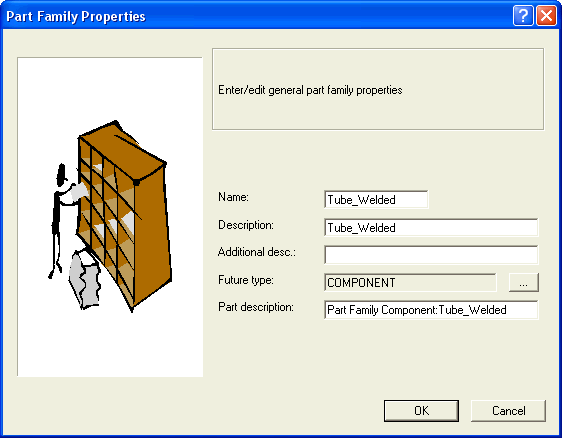
 Create Part Family command to create the family of tubes based on the current model. Accept the default values.
- Start the Catalog Manager command and locate the newly created catalog Tube_Welded in the Part Family index.
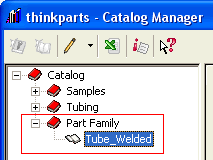
- Right-click the Tube_Welded catalog and select Edit to start the configuration wizard.
- Click the Next > button twice to reach the thinkparts Catalog Wizard (step 3 of 3): Field Attributes page. Click New to create a new field.
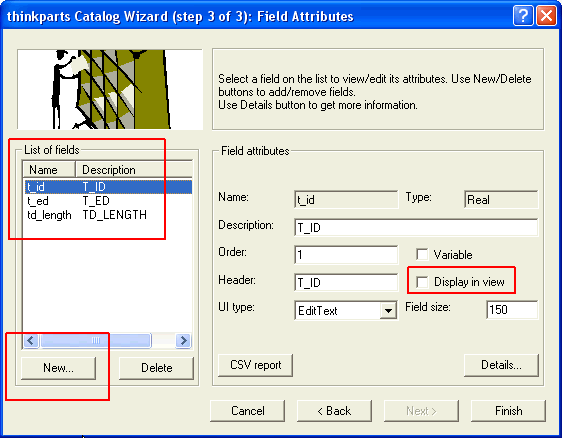
- In the displayed dialog box enter the following attributes and then click OK:
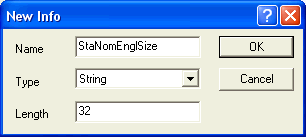
- Name:: StaNomEnglSize
- Type:: String
- Select the Display in view check box for all the entries under the List of fields area, so that the program displays them in the catalog table, then close the wizard by selecting Finish.
(Refer the image in Step 4)
- Right-click the Tube_Welded catalog again, and select Edit Values. Enter some records in the table. For example:
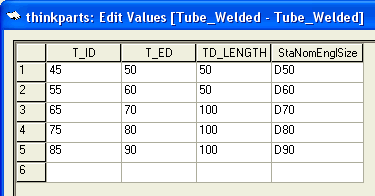
Note that the program overrides the value you enter for the length and uses instead the length necessary to cover the profile when you actually build your pipe. This information is used when calculating the cutting BOM.
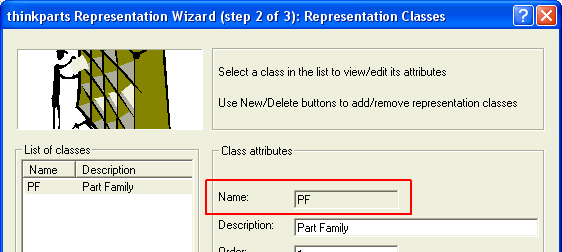
- Right-click the Tube_Welded catalog again, and start the Representations wizard. Click Next > to reach the thinkparts Representation Wizard (step 2 of 3): Representation Classes page, note the catalog Name: attribute. It should be set to PF. If it is set to any other value, take a note of it.
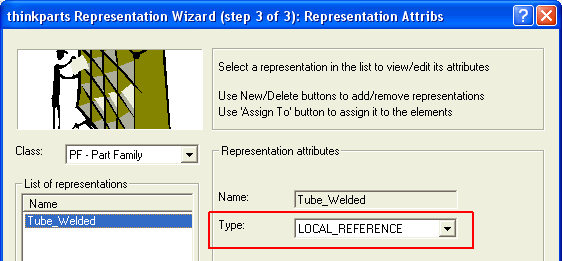
- Click Next > to reach the thinkparts Representation Wizard (step 3 of 3): Representation Attribs page, ensure that Type: is set to LOCAL_REFERENCE. Click Finish to close the wizard when done.
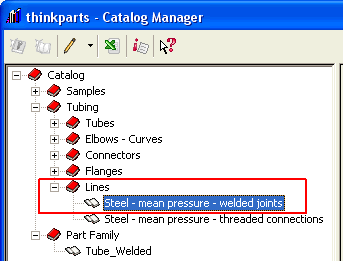
- Locate the Steel - mean pressure - welded joints catalog in the Lines sub-index of the Tubing index. You will add a record to this catalog that describes to the ThinkDesign tubing commands how to use your new pipe catalog.
- Right-click the Steel - mean pressure - welded joints catalog and select Edit Values.
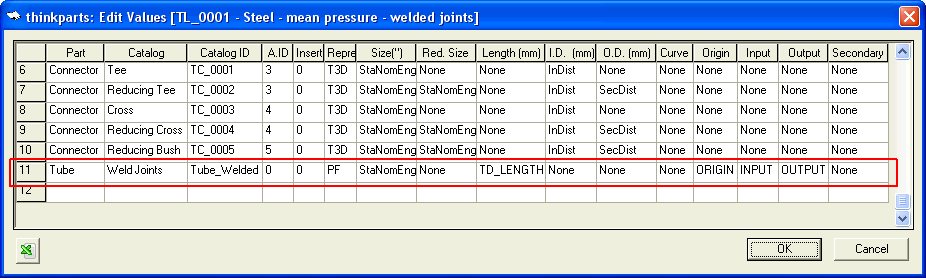
- Now you have to fill up the empty record at the bottom of the grid with the following:
- Enter a value for the Part and Catalog fields. These are descriptive fields; keep it short and clear.
- In the Catalog ID field, enter the name of the catalog you created with the Create Part Family command. It should be Tube_Welded.
- Enter 0 in the A.ID field to tell the program that this is a tube element.
- Enter 0 in the Insert field to tell the program that this element can be inserted automatically.
- Enter PF in the Representation field. This is the class attribute you checked previously.
- Enter StaNomEnglSize in the Size (") field. This is the name of the attribute you previously created and it is used by the program to locate the dimensions of the element in the table of values that you previously edited.
- Enter None in the Red. Size field. Since this is a linear element in which the INPUT and OUTPUT sizes match, we have no reduced size to declare.
- Enter TD_LENGTH in the Length (mm) field. TD_LENGTH is one of the variables defined in the original model and it is used by thinkteam for the computation of the cutting BOM.
- Enter None in the I.D, O.D and Curve fields. You use these in case you are creating a catalog of elbows.
- Enter ORIGIN, INPUT and OUTPUT in the relevant fields. These are the names of the symbolic references that you found in the original model and are used by the program to orient the tube along the profile.
- Enter None in the Secondary field. This parameter is used in the case of a "T" joint.
- Test your work by creating a profile in a model, and by using the Insert Tubing Part command.
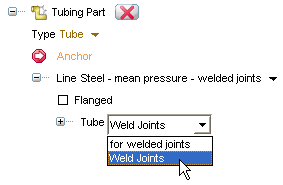
- Expand the Line branch and then select your Weld Joints catalog from the Tube drop-down list.
You might get some warning, ignore it and proceed ahead.
- Expand the Tube branch to display the Tube_Welded table of values. Double-click one of the records to choose the size, then Apply (
 ) the command to insert the tubing element.
Also try to...