Inserting a Tubing Network
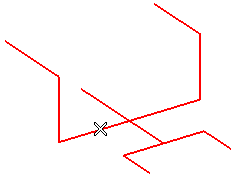
The following illustration explains how to insert a complete tubing network by using the Tubing Network command. Open the Tubing_network_path.e3 file available in the Samples folder of your think3 installation and follow the steps given below.
- On opening the model you will see a 3D profile. It will act as the path over which the tubing network will be created.
- Start the Tubing Network command.
- For the Path selector, you need to select the profile defining the tubing path. You can make the selection either from the Graphics Area or from the Model Structure.
- The Line option is displayed in the selection list; choose Steel - mean pressure - threaded connections for it.
- Expand the Line node (
 ) to view the tubing element options.
- On expanding the node for each option, the corresponding catalog will be displayed. For the purpose of this tutorial, expand the node of the Tube.
- Select the size as 1" by double clicking on any element of that row.
- If you wish you can make additional selections in other catalogs too, but ensure that the elements are well defined in each involved catalog and hence there is one consistent element for each type of tubing element needed to form the network.
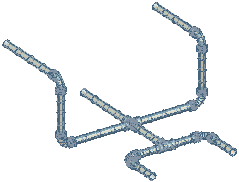
- Select the Preview (
 ) button to view the preview of the network.
Incase your selections in the catalog generates an ambiguous situation, the Show Warnings ( ) button is displayed. Select it to view the warning.
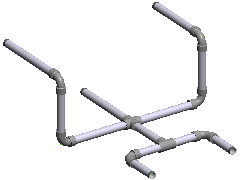
- If satisfied with the preview, you can Apply (
 ) the command to create the tubing network.
Also try to...