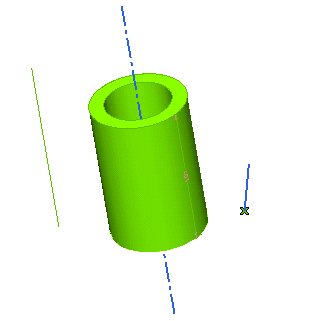
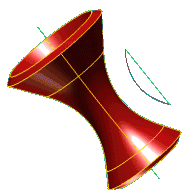
This article will provide an explanation about the two methods of the GSM Radial Bend command. All the images refer to a simple model you can find in file "GRB_Explain.e3"
As the goal of this article is to give a general explanation on the command methods, it will not go into details as to the step-by-step actions you will have to do. For such details see:
Anyway, just as a quick summary the command behavior, when applying a radial bending to a set of entities you will generally have to:
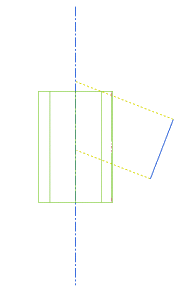
As you have already seen, in order to apply the controlled modification to the selected entities you will have to specify an Axis of revolution (1) and a Bend line (2).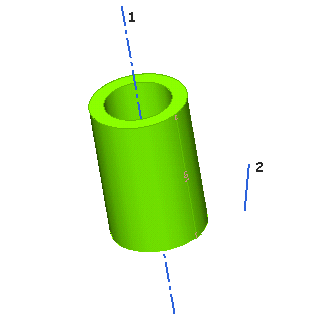
The bending controlled modification will be propagated around the chosen axis of revolution (1), while the domain of the controlled modification — i.e.: the portion of the selected entities which will actually be affected by the controlled modification — will be defined by the bend line (2).
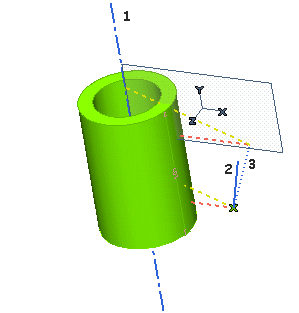
As shown in the illustration below, if the bend line (2) is not coplanar to the axis of revolution (1), what the command will actually use is its projection onto the plane defined by the axis of revolution and the first end point of the bend line (3).
| Some conditions
The axis of revolution and the bend line must satisfy the following conditions.
 ) shows up and a proper message is displayed if you click on the button. ) shows up and a proper message is displayed if you click on the button.
|
There two different methods you can make the command work according to. You can select the method in the Perpendicular drop-down list under More Options, you can determine whether to apply the controlled modification in such a way that:
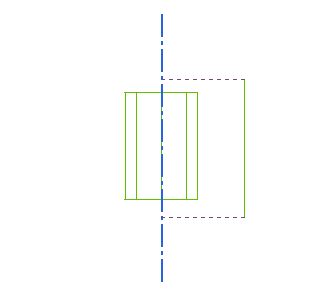
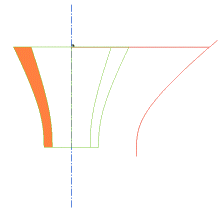
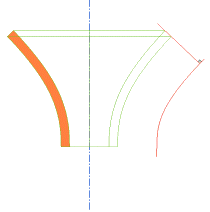
Choosing a certain method rather the other one also affects the domain of the controlled modification, that is a closed area rotated about the axis of revolution. As you can see in the illustration below:
 |
 |
| Perpendicular to: Axis of revolution |
Perpendicular to: Bend line |
Depending on the chosen method (i.e.: on the different domain), there will also be differences in the ways the selected entities are split. In addition the parts of them that are outside the domain will be modified or not depending on the Status options selected at the First and Second cutting lines, as described in "Apply constraints along the cutting lines".
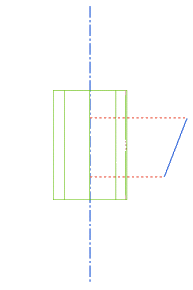
If the bend line is parallel to the axis:
then the domain of the controlled modification will be the same whichever of the two methods you select.
Now suppose the bend line is parallel to the axis of revolution (which should be the most common real-world situation). As already seen, in this case the domain is always the same, no matter which method you may have chosen.
Now, suppose you have set the Status constraint to Rotation both at the First and at the Second cutting line, as in the following illustration:
 |
 |
| Perpendicular to: Axis of revolution Status = Rotation at both cutting lines |
Perpendicular to: Bend line
Status = Rotation at both cutting lines |
 |
 |
| Perpendicular to: Axis of revolution Status = Fixed at First cutting line, Free at Second cutting line |
Perpendicular to: Bend line
Status = Fixed at First cutting line, Free at Second cutting line |
When the method is Perpendicular to Axis of revolution, since any entity that was perpendicular to the axis is still like that after the controlled modification, the borders of the pipe (plane surface) are still perpendicular to the axis of revolution.
In this method, the ratio between the distance from the original bend line and its bent version is maintained. This means that if a point was in the middle between the axis and the line, it will be in the middle in the result as well. As a consequence, in the example you can see the thickness along the pipe will vary: it will be thinner in the middle because the result line (in red) comes closer to the axis.
On the other hand, when the method is Perpendicular to Bend line, everything that was perpendicular to the bend line is still like that after the controlled modification. This is why, as you can see in the example, the section of the border is still perpendicular to the bend line.
You can also notice the thickness is uniform, but this is also partly because the bending line was parallel to the pipe. This method maintains the distance between the bending line and any point along the whole section.
This is the reason why an Axis clearance option is available with this method: the points on the axis belong to all sections, so there would be a problem when trying to move them. The Axis clearance enables you to set a proper distance value to avoid this problem.