Generating Camera Movements During Animation
It is strongly recommended to go through the Creating an Animation document before attempting this tutorial.
It is possible to modify the position from which the animation is being viewed as if being looked through a camera. Follow the steps given below to understand the details on how to control the camera orientation by specifying data for the Camera evolution.
In the first case, the animation is created in which the camera remains stationary at one location, however rotates itself to pan on the model.
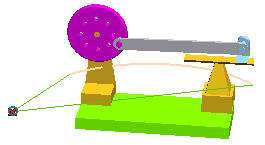
- Open the Camera.e3 file from the Samples folder of your installation. In the assembly, you will find a red curve, blue curve and a red point (use the Fit View command if required). The curves and the point will be used to specify the camera's movement and its focus.
- Invoke the command; the Animation dialog box is displayed. Note that the animation for running the assembly is already created.
- Activate the Fixed Camera animation in the List of Animations: area. Please refer to the Managing the Animation List document for details.
- Create a new Camera evolution by referring to the Adding Evolution for Animation document.
- Create the variation for the Camera evolution by referring to the Creating Variations document and then set its parameters as:
Start time = 0, End time = 20
- Right-click on the variation for the camera and select the option from the context menu; the Animation - Evolution selection list is displayed in the Graphics Area. Now the following two items need to be necessarily selected:
| Camera Path |
It is the point or the curve that defines how the focal point of view changes in time.
- Selecting a point means that the camera's focus is fixed on it.
- Selecting a curve means that the camera is panning and its focus is moved along the specified path
|
| Target Path |
It is the point or the curve that defines how the target of the camera changes in time.
- Selecting a point means that the target is fixed
- Selecting a curve means that the target is moved along the specified path
|
Note
In case the selection is a curve, the context menu on the selector shows the Invert Movement Direction option. Since a curve has its own orientation, the camera or the target will be moved accordingly. By using this option the user can invert the movement direction. |
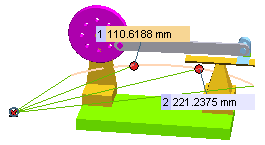
- For the Camera Path selector, select the red point. For the Target Path selector, select the blue curve. The selections will be highlighted on the Graphics Area as shown below.
Such a selection will make the camera's position fixed at the specified point. However, the camera will pan (rotate) so that its focus moves along the specified curve.
- Additional control over the camera movement can be achieved by specifying the options available under More Options. These are:
No. of Control Points
The default value is 0. In this case, the camera movement is calculated by interpolation considering the total time frame of the Camera variation and the specified camera data. For a 0 value the camera moves at a constant velocity over the specified time frame.
If one or more control points are specified, the time frame of the variation can be divided into as many parts. The velocity of the camera between two consecutive control points is decided by the location of the points over the curve. The following image shows the situation for two control points.
The position of the control points can be modified by dragging them to the desired location. By inverting the position of the control points, it is possible to temporarily invert the camera movement direction.
Direction
The data for the direction option specifies the orientation of the camera. By default the Z direction is considered. However, it can be changed to X or Y. The direction can also be specified by selecting Line or 2 points option.
- Once all the parameters have been specified, select the OK (
 ) button to continue.
- Now playback the animation by referring to the Animation Playback document. Ensure before playback that the current view has been set to Perspective Projection.
In the second case, the animation is created in which the camera moves along a specified path; however it constantly maintains its focus at a point on the model.
- Activate the Fixed Focus animation in the List of Animations: area. Please refer to the Managing the Animation List document for details.
- Repeat the steps 4 and 5.
- For the Camera Path selector, select the red curve. For the Target Path selector, select a point at the center of the wheel. The selections will be highlighted on the Graphics Area as shown below.
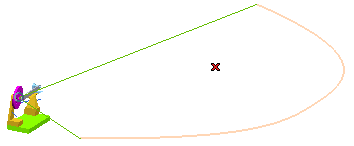
Such a selection will make the camera move along the specified curve. However, the camera will be constantly focused at the center of the wheel.
- Repeat the steps 9 and 10.
Note
You can hide the curves and point before animation playback to avoid their presence. |
Try to ...