Adding Evolution for Animation
Each animation is composed of multiple Evolutions. To create a new evolution, right-click in the evolution display area and select from the context menu; the
Add Evolution dialog box is displayed from which the four types of evolution can be selected as explained below.
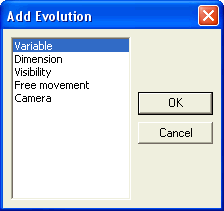
Variable
- Select Variable from the
Add Evolution dialog box and click the
OK button.
- The dialog box is displayed, which contains all the variables assigned to the current model/assembly.
- Click on the row number for the variable that is to be used for the animation. The name of the selected variable is displayed besides the Selected variable: option in the
Animation - Evolution selection list.
- Click the OK (
 ) button to continue.
Variable (assigned to an assembly component)
- Select Variable from the
Add Evolution dialog box and click the
OK button.
- The dialog box is displayed. It contains all the variables assigned to the current assembly but not to the individual components.
- Select the component from the Graphics Area to view its variables in the spreadsheet. The
 symbol appears besides the Component Containing Variables option in the
Animation - Evolution selection list, confirming that the selection has been made.
symbol appears besides the Component Containing Variables option in the
Animation - Evolution selection list, confirming that the selection has been made.
- Click on the row number for the variable that is to be used for the animation. The name of the selected variable is displayed besides the Selected variable: option in the
Animation - Evolution selection list.
- Click the OK ( ) button to continue.
Dimension
- Select Dimension from the
Add Evolution dialog box and click the
OK button.
- Click on the dimension in the Graphics Area that is to be used for the animation. The symbol appears besides the Dimension option in the
Animation - Evolution selection list, confirming that the selection has been made.
- Click the OK ( ) button to continue.
Visibility
- Select Visibility from the
Add Evolution dialog box and click the
OK button.
- Select the entities from the Graphics Area whose visibility is to be controlled during the animation. The symbol appears besides the Entities option in the
Animation - Evolution selection list, confirming that the selection has been made.
- Click the OK ( ) button to continue.
Free movement
- Select Free movement from the
Add Evolution dialog box and click the
OK button.
- Select the component (not a solid entity) from the Graphics Area whose free movement is to be captured during the animation. The symbol appears besides the Component option in the
Animation - Evolution selection list, confirming that the selection has been made.
- Click the OK ( ) button to continue.
Camera
- Select Camera from the
Add Evolution dialog box and click the
OK button.
Note
It is possible to have only one Camera evolution per animation. If the
Camera evolution has already been added into an animation, it will not appear in the
Add Evolution dialog box containing the list of evolutions available for insertion. |
- The new evolution is immediately added to the evolution display area.
Unlike other evolutions, it is possible to specify the set of data required to control the camera orientation only after inserting a variation for the Camera evolution.
Note
To change the selection after the symbol appears besides an option, right-click on the option and select Reset from the context menu. |
Once the selection is confirmed by choosing the OK ( ) button, the evolution name is displayed with a green background in the evolution display area of the
Animation dialog box. Also, a blank scroll bar is displayed in the graphical area in which the corresponding variation will be created. Note that the scroll bar for the
Visibility variation is grey in color.
Related Topics