
![]()
Insert  Dimension Welding Symbol
The Welding Symbol command enables you to insert the symbol of a weld.
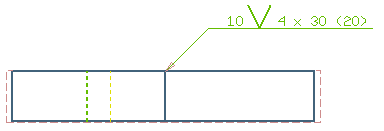
The welding symbol contains all data about the weld. If you have already drawn the bead with Welding Bead and/or the section with
Welding Section, you can use the
Data from Welding selector in the selection list to recall the data from the existing weld representations.
After you define the welding symbol origin with the Point of interest selector, you are enabled to drag the handle to move the welding symbol to a new position. Drag it to the left of the origin to flip the welding symbol.
The selection list changes according to the current welding type selected from the Basic Symbol drop-down list. Use the Switch Side option to move the symbol and other information to the other side of the reference line.
You are enabled to select the format of the welding symbol as single, double, symmetric weld and a sequence of up to three operations necessary to produce the weld. For the double weld and for the sequence of operations you also need to specify which side or operation the set of parameters refer to.
Optionally add supplementary and contour symbols and the dashed identification line.
You can change the size of the welding symbol in the Symbol Scale option.
Depending on the current basic symbol, a series of options enable you to set and display the relevant measure in the welding symbol; select the check box to enable the display of the measure.
The tail of the weld symbol is the place for supplementary information on the weld. It may contain a reference to the welding process, the electrode, the reference to a detail drawing, any information that aids in the making of the weld that does not have its own special place on the symbol. The program provides you with up to three lines of text and a check box that encloses the tail information in a square, thus making it a reference.
Double-click an existing welding section entity to re-enter the command in order to modify its parameters.