
Note that the program draws the symbol review in a predefined position; drag the red square to a different position if you need to reposition it a this time.
- Penetration
- Segment length
- Spacing
- No. of beads
 to create the welding symbol.
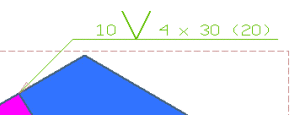
In this task you will use the Welding Symbol command to add the welding symbol to a drawing exploiting the information already present in a welding bead. To follow this step-by-step example, load the Weld_Vbutt.e2 drawing.
Before you start, check that the welding standard set in the Organize Weldings dialog box suits your needs, then familiarize with the scenario: you have two parts welded together with a V-Butt weld with its section and bead already drawn (if not, refer to Inserting a V-Butt welding bead:

Also, open all the views in the drawing in order to be able to select the existing weld representations.
| 1 | Start the Welding Symbol command and select the point (1) where you wish to attach the symbol: Note that the program draws the symbol review in a predefined position; drag the red square to a different position if you need to reposition it a this time. |
| 2 | The Data from Welding selector is active: select the welding section and bead in the relevant views; notice how the options in the selection list are updated with the data read from the existing weld. |
| 3 | Check the following options in the command selection list, and notice how the symbol preview changes to reflect your input:
|
| 4 | Click the to create the welding symbol. |