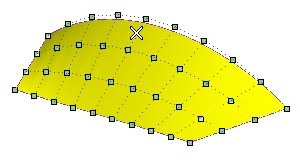
| 1 |
If not already selected, in the Mode drop-down list select Edit Control Points.
|
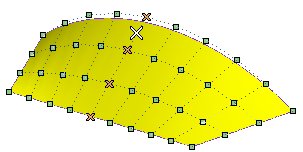
| 2 |
Select the control points (by clicking or using a window/lasso selection).

- To select all the control points that define a "rectangle" in the mesh, hold down the SHIFT key while selecting the control points corresponding to the first and the last vertex.
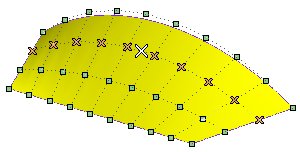
- The selection of an entire "row" of control points is very simple. In fact, you just need to click on the one of the two dotted "lines" of the polygon mesh along the direction of which you want to select the points. You can proceed as follows:
There are two lines of the polygon mesh intersecting just below the position of the cursor. If you click on any position along the line of the polygon mesh above or below the point:
all the "vertical" row of control points will be selected:
Similarly, if you click on any position along the line on the left or on the right of the point:
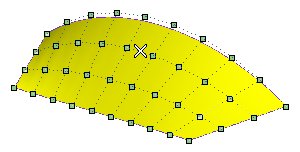
all the "horizontal" row will be selected.
Alternatively, you can hold down the SHIFT key while selecting the control points corresponding to the first and the last end point.
- To deselect a selected point, click on it while holding down the CTRL key.
Additional control points can be added to the currently selected ones by picking the control point to be added while pressing the CTRL key of the keyboard.
|
| 3 |
Move the selected points. You can move control points in one of the following ways:
- By steps
- By dragging the control point to another location using the mouse and then clicking the mouse button to fix it at the new location.
Using some keys of the keyboard, you can constrain points to move along the direction of an axis. Proceed as follows:
- While dragging the points (after you've pressed the selection button of the mouse), click one of the following keys (no matter whether upper or lower case):
| H |
to constrain points to move along the horizontal direction of the screen |
| V |
to constrain points to move along the vertical direction of the screen |
| D |
to constrain points to move along the depth direction (the one perpendicular to the plane of the screen).
- The distance points will be moved along the depth axis is the same as the one you moved the mouse from the original position along the horizontal axis.
- If you move the mouse to right, the points will be moved in the positive depth sense (outward from the screen); if you move the mouse to the left, the points will be moved in the negative sense (inward to the screen).
|
| X |
to constrain points to move along the X direction of the Work Plane |
| Y |
to constrain points to move along the Y direction of the Work Plane |
| W |
to constrain points to move along the Z direction of the Work Plane. |
- To release the constraint, release the selection button of the mouse. Click another of the above listed keys to change the constraint.
Undoing control point movements
|
|
| 4 |
|
| 5 |
As soon as you double-click on an empty position of the graphics area the change is applied. |