
![]()
Insert Sheet Metal Step Bend
The Step Bend command enables you to replace an existing Fillet or Bend with a step bend of which you can define:
The fillets or bends you selected will be replaced with a step bend with the number of bends you specify or as calculated from the chordal error value you specified.
After starting the command you will have to choose an existing fillet or bend and specify the number of bend needed in the step bend. You can also choose to keep all the bend angles of the step bend constant or make them vary.
You can assign specific values to the related Sheet Metal parameters (different from the general ones defined in the Sheet Metal category of the Entity Properties) by selecting Local Properties and proceeding as described in Local Properties and the Lock Marker.
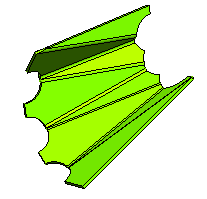
You are able to create steps on a twisted bend surface, as shown in the images below.
 |
 |
|
| Twisted bend surface | Step bends created |
A message is displayed in case the specified relief diameter is greater or lesser than the required relief diameter.
You need to set the Circular option in the Type: drop-down list of the Entity Properties-Sheet Metal-Corner Reliefs category before applying the Step Bend command on the twisted bend surface.
| Editing the number of steps
The command shows the number of steps as a driving dimension. This enables you to edit the number of steps without redefining the feature, for instance by the usual Edit Driving Dimension dialog box, entering a different number of steps in the Value box of the dialog box. It also enables you to assign a variable to the number of steps. |
