
![]()
Insert Curve Light Contours
The Light Contour Curve command enables you to create curves on shape contours of the type you can select in the Type drop-down list:
It can be applied to surface and mesh entities. For meshes, note that the Light Contours algorithm requires the normals to the mesh nodes which can be computed beforehand using Add Normals to Mesh command.
The main features of the three types are described below.
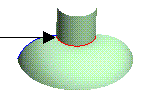
The silhouette of a surface is normally composed of:
 |
The apparent contours of the surface — the curves defined as the sets of the points at which the normal to the surface is parallel to the view plane. Note that the curves corresponding to apparent contours are cubic. |
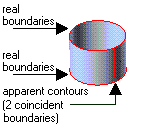 |
The real boundaries of the surface — the surface boundaries (the isoparametric curves with the lowest and highest parametric values, or in the case of surfaces with parameter limitations, the limiting curves) which do not coincide with other boundaries of the surface. For example, in the case of a circular cylinder, the real boundaries are the two base circles (which are separate) while the two generator lines are not real boundaries since they coincide. |
 |
The edges of the surface (if any) — the isoparametric curves defined as the sets of the points where the surface has only positional continuity (continuity 0). |
The color in which real boundaries and edges are drawn may be different from that of apparent contours.
If you select Highlights, you may want to study the behavior of the surface in a certain point. To do so, select
Highlights through point in the selection list and click in the desired position. If you select the preview button (  ), a highlight curve through the selected point will be displayed(the number of curves must be at least one or greater).
The default number of highlight curves to be created is one. To increase it, change the No. of curves value.
The Interactive direction check box enables you to use an interactive mode for the definition of the highlight direction:
You can also change the Density angle of highlight curves. When you decrease the density value highlight curves will be more "concentrated" around the selected point. When you increase the density value highlight curves will be distributed on a wider area. Density values vary in the range [0-360] (if a bigger value is entered, it is automatically set to 360).
If you select Isophotes, when you click the preview button ( ), the default number of displayed curves is one. To increase the number of isophotes, change the
No. of curves value.
Using the Parallel direction item in the selection list, you can define the direction of isophotes/zebra lines. Alternatively, you can use the
Interactive direction check box.
You can also change the Density of isophotes. Density is an angle. When you decrease the density value lines will be more "concentrated", while when you increase the density value lines will be distributed on a wider area. Density values vary in the range [0-90] (if a bigger value is entered, it is automatically set to 90).
The Quick preview option enables you to display a fast preview of the parting line, which can be displayed as a line or by shading surfaces using two different colors (or three, where the third is used for vertical areas). For further details see the Quick preview note in Creating the silhouette curves of a surface.
An Insert Curve on Surface check box is available in the selection list, enabling you to create curves of the "Curve on Surface" type (See " Curves on Surfaces" for details).
The Associative Mode check box is also available, enabling you to create curves which retain a link to the surface they derive from. See further details on associativity for curves of the Curve on Surface type in " Curves on Surface".
If you interrupt the command, your selections and settings are not lost: they are "frozen" in order to enable you to use them again without having to repeat them all.
Next time you start the command, in fact, the Restore Selection button (  ) will be displayed on top of the selection list. If you select the
Restore Selection button ( ), all the selections you made and the settings you defined last time you used the command will be restored, enabling you to go on with no need to repeat those selections/settings.
) will be displayed on top of the selection list. If you select the
Restore Selection button ( ), all the selections you made and the settings you defined last time you used the command will be restored, enabling you to go on with no need to repeat those selections/settings.
When the command is started with some pre-selected entities, if you click the Restore Selection button you will be asked to confirm restoring the frozen command selections, thus resetting the current selection.
Further details in "Restore Selection modality for selections and settings".