
![]()
Insert CurveOffset on Surface
The Offset on Surface command enables you to create offset curves on a surface or on a plane, from a set of one or more user selected curves. An offset curve is a curve whose distance from a selected curve is constant at all points along that curve.
After starting the command, you need to select the curves to offset for the Curves selector. You can select chains of consecutive curves by right-clicking on the portion of the curve and then selecting SelectChain from This in the context menu.
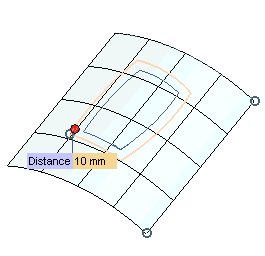
If the selected curves do not lie on the surface/plane, the offset curves will be created starting from their orthogonal projection onto the surface.
You need to select in the On drop-down list Surface or Plane to create the offset curve on a surface or plane, respectively.
 |
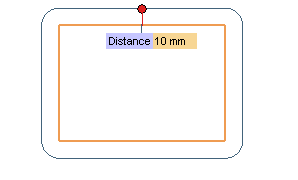
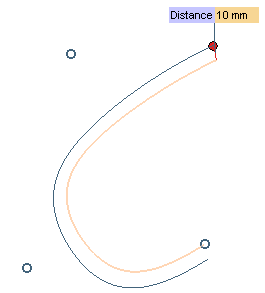
At a given distance along the normal direction by specifying the required value in the Normal distance mini-dialog box. |  |
|
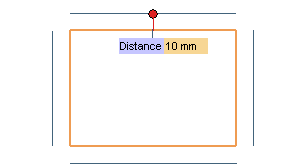
At a given distance along the binormal (*) direction by specifying the required value in the Binormal distance mini-dialog box. |  |
|
At any combination of distances along the normal and the binormal directions. Instead of specifying values in the mini-dialog boxes, you can drag the corresponding handles to interactively assess the resulting curves in the preview. |  |
|
If the Binormal distance is set to 0, then the Insert Curve on Surface check box is active.
|
While offsetting on a plane (On is set to Plane), the offset of a 3D curve is computed by using a reference plane. Select the plane definition method in the Plane drop-down list:
| On Face | A face of a solid (to be selected for the Face selector). |
| 3 points | The plane which contains the three points (to be specified for the 3 points selector). |
| Plane | An existing plane (to be selected for the Plane selector). |
| Through axis & point | A plane passing through an axis and a point (to be selected for the Axis and Point selectors, respectively). |
| Perpendicular to axis & through point | A plane orthogonal to an axis and passing through a point (to be selected for the Axis and Point selectors, respectively). |
| Coefficients | A plane defined through the coefficient values of its Cartesian equation (Ax+By+Cz+D=0), to be specified in the respective mini-dialog boxes (Coeff. A, Coeff. B, Coeff. C, Coeff. D), and at a point (to be selected for the Point selector). |
See "How to define an axis or a line" for details on making selection for Axis.
The projection mode can be chosen in the Projection drop-down list.
| Normal | Enables you to create the offset curve using a normal projection. |
| View direction | Enables you to create the offset curve using a projection along the current view direction. |
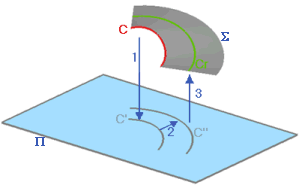
The 3D offset of a curve is then created according to the following internal procedure:
While making the offset on plane, the Transition drop-down list is available.
In the Transition drop-down list you can select the method to be used upon selection of a chain of consecutive curves. Some of these options are not displayed on starting the command in the 2D Profile environment, as they are not relevant there.
| Extend parameter when this option is selected, if the chain of curves has sharp corners and the offset requested is made in the area on the outside of them, the corners are not filleted, instead the adjacent curves are extended. When it is not possible to extend the curve, a warning will be displayed to highlight the failed transition. |
 |
| Extend curvature this option can be selected when it is not possible to obtain a parametric curve extension through the Extend parameter option, since the extended offset curves would not intersect. Two additional extension curves will be created, so as to obtain the intersection. The two curves will have curvature continuity (G2) with the offset curves. |
 |
| Extend tangent this option can be selected when it is not possible to obtain a parametric curve extension through the Extend parameter option, since the extended offset curves would not intersect. Two additional extension curves will be created, so as to obtain the intersection. The two curves will have tangency continuity (G1) with the offset curves. |
 |
| Fillet when this option is selected, if the chain of curves has sharp corners and the offset requested is made in the area on the outside of them, they are filleted. |
 |
| None when this option is selected no trimming or filleting action is performed on the offset curves. Please note that, if the Automatic cut check box is not selected in the Construction - Advanced category of the System Options, the None option is automatically selected by the application, and no other choice is possible. |
 |
The Copies check box enables you to choose either to copy or to move the original curves.
There may be situations in which some of the resulting offset curves are overlapped. A Curve(s) to Be Deleted selector is displayed and available in the selection list when the resulting offsets include overlapping curves, so as to enable you to get rid of them. For example, take a look at the following model.

Suppose you start the command and select all the lines of the two rectangles. For a certain value of the distance, the offset of the second rectangle is reduced to a line (two overlapping lines). In this case the Curve(s) to Be Deleted selector is displayed in the selection list.
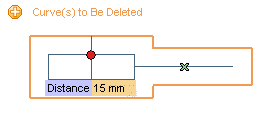
You can click on the selector and then select the markers in the middle of the curves to be removed. The selected curves will be deleted.
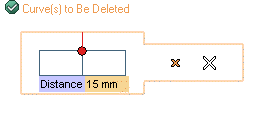
The Remove All Overlaps check box is also available, which enables you to remove all overlapping curves simultaneously, without the need of selecting them one by one.
The Associative Mode check box is also available. It enables you to create curves which retain a link to the curves they derive from:
For further details, see "Associativity".
The Use inferred surface check box is displayed when at least one of the selected curve is a 3D curve (and none is a COS).
The Use base surface check box is displayed when all of the selected chain of curves (except the planar ones, if any) are composed of curves of the Curve On Surface (COS) type.
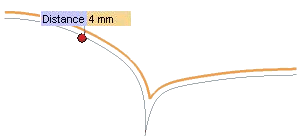
At times a gap (G0 discontinuity) occurs between two parts of resulting offset curve beyond a certain offset length due to the original (3D) curve's curvature, as highlighted in the image below. In such situations, the Blend angle check box is available.
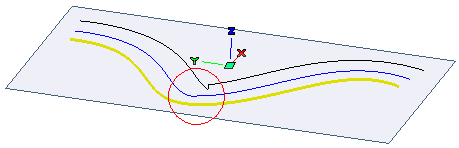
Original yellow curve; offset blue curve is normal; offset black curve has discontinuity.
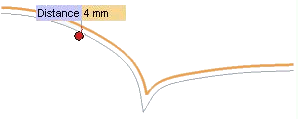
Definition: The Blend Angle is the angle between the tangent at the middle of blend curve and the selected plane. Bigger the blend angle, more vertical and shorter the blend curve.
Consider the following image as an example. From a certain offset length, offset of the yellow (3D) curve has a discontinuity as visible in the resulting black offset curve. The transition at the discontinuity is a vertical straight line. By selecting the Blend angle check box and defining the blend angle value (in degree), you will obtain smoother transition as shown by the blue and green curves.
| Blend angle=90 | 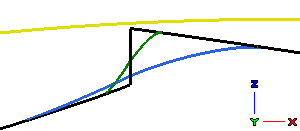 |
| Blend angle=45 | |
| Blend angle=20 |
The Update preview at end drag check box under More Options enables you to control the preview update mode when the offset curves are dragged using the proper handle.
(*) The binormal at a point of a curve is the normal to the surface on which the curve lies at that point.