

Insert Surface
 Pipe
Pipe
The Pipe Surface command enables you to create circular section surfaces (pipes) along a path defined by a chain of
Drive Curves, which can also contain sharp points. You will have to select the drive curves and to specify the radius of the pipe.
If a drive curve has no sharp points (that is: points where the continuity is only positional, G0) or points where the continuity is no more than
tangency (G1), the resulting surface relative to that curve will be just one. On the contrary, if there are G0 or G1 points, a new surface will be created along each part the drive curve chain is divided into by those points.
If you have more than one drive curve you will obtain:
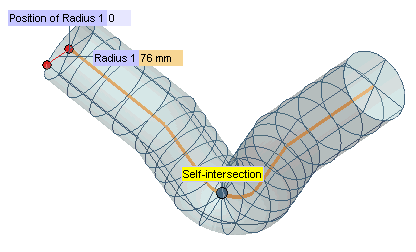
Once the drive curves have been selected, if you click the Preview button (  ), you are enabled to define the radius of the pipe either by dragging the handle or by specifying the numerical value in the
Radius 1 mini-dialog box at a point which is initially the first endpoint of the selected drive curves, but which you can move along such curves either by typing a new parameter value into the
Position of Radius 1 box or by interactively dragging the corresponding handle.
| Extending or restricting the pipe The Extend/Restrict drop-down enables you to extend or restrict the pipe according to the method you can choose in the drop-down list.
|
The With Transitions check box under More Options enables you to control the resulting surfaces at each sharp point:
The radius of the pipe can vary along the drive curves. You can specify different radius values through the Add Radius command of the contextual menu displayed by right-clicking on the point of the drive curves where you want the different radius to be applied (if you don't click exactly on the drive curves, your click point will be projected onto them). A
Radius n and a
Position of Radius n handle/mini-dialog box pair will be displayed each time you do so.
Additional radii can be removed by right-clicking again and selecting Remove Radius in the context menu:
The With Endcaps check box under More Options enables you to create the two surfaces which close the pipe at both of its ends.
Finally, in order to improve the final shape and to gain better control on its degree and continuity values, you can choose the method to be used for the interpolation of the radius in the Radius interpolation drop-down list under More Options.
| Max. degree 3 | When this option is selected, the final degree along the U direction for the final shape will be 10. When the drive is closed, if the motion is continuous enough, the continuity value at the closure point will be C2. Please note that if the number of sections is lower than or equal to 4, then the final U degree of the shape will be lower than or equal to 10. |
| Max. degree 5 | When this option is selected, the final degree along the U direction for the final shape will be 12. When the drive is closed, if the motion is continuous enough, the continuity value at the closure point will be C4. Please note that if the number of sections is lower than or equal to 4, then the final U degree of the shape will be lower than or equal to 12. |
| Associativity The surfaces created using this command can be associative: associative surfaces are Skins, that is open solids, retaining a link to the base curves, so that if you modify the base curves the surfaces will be modified accordingly; they have a history and are displayed in the Model Structure. See " Associative Surfaces (Skins)" for details. |
Finally, note that self-intersections are detected and pointed out through a specific warning message. In the following example the specified value of the radius is too big, thus causing the resulting surface to have a self-intersection. A specific message is then issued to warn you about this situation.
