First, set the curve shape at the endpoints.
Select an option from the Rule drop-down list under More Options:
- Natural — the section of the curve near the end point has null curvature: it coincides with the tangent to the spline at the end point
- Circular — the section of the curve near the end point coincides with a circle passing through the three interpolation points nearest to the end point
- Quadratic — the section of the curve near the end point has the shape of the curve of degree 2 through the three interpolation points nearest to the end point.
- Cubic — the section of the curve near the end point has the shape of the cubic curve through the four interpolation points nearest to the end point.
| Points | To enter points by specifying them directly in the document, by clicking or using the snap commands. |
| ASCII file | To read the points in an ASCII file that can be selected in an ordinary file selection box by clicking Browse. |
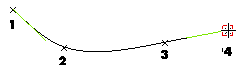
The spline curve is dynamically displayed while you're specifying interpolation points.
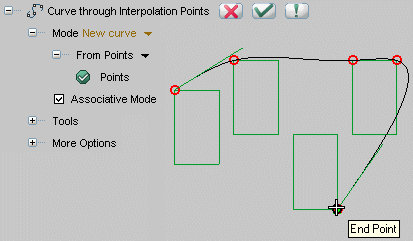
| Associativity If you select the Associative Mode check box in the selection list and enter points by snapping to special points of existing entities in the model, an associativity link will be retained between the created point and the special point you snapped to. If the position of the special point changes, the position of the point you created will change as well and the curve shape will be modified accordingly. When inserting points in the associative mode, a circle marker is displayed instead of the normal square marker: |
All the edit operations, such as select and move for existing points or editing of the tangents are available during the creation process.
The Degree drop-down list under More Options enables you to choose 3 to create an ordinary cubic spline, 5 to create a quintic curve or 7 to create a septic curve when you need smoother continuity at the interpolation points.