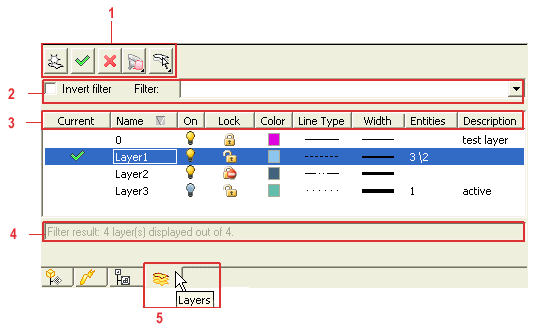


On selecting Layers tab from the left pane of the model/drawing document, the program displays a control frame as shown in the image below — here presented after three new layers have been created besides the default layer '0' —:

| 1 | - | Layer editing buttons | Allows layer editing. |
| 2 | - | Custom filter control | Enables to make custom search on the layers by properties in common. |
| 3 | - | Layer properties controls | Enables to customize the properties of a layer. |
| 4 | - | Filter results area | Displays the filter results in that area. |
The top of the control frame lists a series of buttons ordered horizontally that enable you to access the main commands:
 |
New Layer |
 |
Set Current Layer |
 |
Delete Layer |
 |
Filter Layers |
 |
Select Layers |
The area 2 in the figure, under the Masters, has two controls — Invert filter (check box) and Filter: (editable drop-down list).
The area 3 consists of nine columns that enable you to define/modify different properties relevant to the item selected in the column.
| Column name | Description and usage | |||||||||
 Current Current |
Indicates the current layer — the layer on which new entities are created. The current layer is also displayed and dynamically updated in the drop-down list of the Set Current Layer toolbar. | |||||||||
| Name | Displays the name of the layer. It is possible to rename a layer (accepts both numeric and alphanumeric values) in the following ways:
|
|||||||||
| Indicates the visibility of the layer. To turn on/off a layer, left-click on the corresponding icon. | ||||||||||
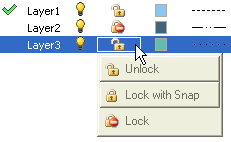
| Lock | Indicates the layer lock status. To lock/unlock a layer, left-click on the Lock icon and then select the new status from the Lock drop-down list, as show in the image below:
|
|||||||||
| Indicates the color assigned to a layer. To change the color associated to a layer, left-click on the Color icon and then select the new Color from the application Color palette which immediately shows up. The layer color affects only the entities on a layer whose color is set to By layer (the associated attribute of a current layer). |
||||||||||
| Line Type | Indicates the line type assigned to a layer. To change the line type associated to the layer, left-click on the Line Type icon and then select the line type from its drop-down list. The layer line type affects only the entities on a layer whose line type is set to By layer (the associated attribute of a current layer). |
|||||||||
| Width | Indicates the width assigned to a layer. To change the width associated to the layer, left-click on the Width icon and then select the line width from its drop-down list. The layer width affects only the entities on layers whose width is set to By layer (the associated attribute of a current layer). |
|||||||||
| Entities | Displays the number of visible and hidden entities on each layer in the format visible\hidden — for example, 3\2 as shown in the image above. | |||||||||
| Description | Contains optional information that helps the user to identify the content of each layer. |
The above described layer properties can be customized to make them visible by right-clicking and selecting the check box of the required property from the available list. The column order can be customized:

The customize dialog box provides you with the following controls:
The improved layer list displays all the existing layers and their associated properties. The generic information about the layer list follows:
The OK button close the dialog and applies all changes.
The Cancel button close the dialog and discards all changes.
The Reset button restores the official settings, for the default width, order and visibility status. Pressing it, a warning message box appears to ask the user confirmation on the action.
When the user changes the width of one or more columns on the Layer page, then this information is saved and restored for all successfully opened document
The Filter result field displays results of the matched filter criteria (that is: filter on name or that of the defined filtering option — All Layers, Layers On, Locked Layers, Layers with Entities, Selected Layers).