Editing an Exploded view

The various Group and Step selectors of the Explode Assembly command provide useful means to group together movements of parts which have a logical relation. They also make retrieval and editing of the exploded views very simple. You can also name them meaningfully so that it helps in identifying them for editing.

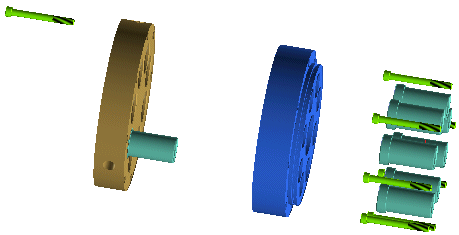
In the default explosion of the Pump subassembly (exp_view_edit.e3 file present in the Pump folder available inside the Samples folder of the think3 installation), positions the base parts (M8 bolt and Sleeve) and their component patterns at different locations. This positioning depends on how the assembly was created. The exploded view has to be edited so that the related parts are grouped together in a meaningful way.


Note
The following steps show how to edit an exploded assembly and are based on the methods described in the Exploding an assembly document.

  1. The existing bookmark can be modified to start the editing operation. Open the exp_view_edit.e3 file from the Pump folder available inside the Samples folder of the think3 installation.

  2. Click on the Visual Bookmarks tab to access the bookmark tree.

  3. Right click on the Pump_Assy1 bookmark and select the Modify option from the context menu. The selection list is displayed enabling you to access all the steps that were involved in the creation of the exploded view.

  4. You can set the orientation to Left Front for clear visualization of the components.

  5. In the Explode Assembly selection list expand all the nodes. Right click on the sleeve and select the Reset movement option from the context menu, as shown below.
    The position of the component Sleeve is reset and it is brought back to its original position.

  6. Now modify the position of the component M8 bolt. To do so, right click on 37 Mating 215 - M8X80 in the selection list and select the Reset movement option from the context menu. The movement of the component M8 is reset and it is brought back to its original position.

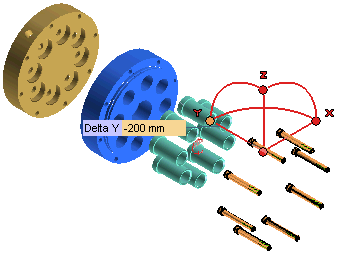
  7. It is now necessary to group together all the M8 bolts and specify their displacement. Select all the instances of M8 bolts, the translation handle in displayed on one of them. Click on the Y node of the translation handle to get the Delta Y mini-dialog box. In it, enter the value -200mm for displacement in the negative Y direction.


    At this point you can see that all the parts of the sub assembly are positioned such that the similar components are together and the exploded view is clear.

  8. Select the OK button on the top of the selection list to execute the command.

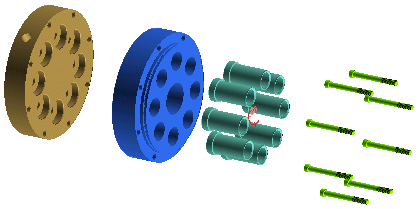
  9. To check the visual bookmark that is created, right click on the Pump_Assy1 in the visual bookmarks tree and select the View Exploded Assembly option from the context menu. The exploded view created is as shown below.


Key points in modifying an exploded assembly
  1. Each Step can be edited at any time to add parts, movements and path lines.
  2. It is possible to include one part in more than one Step.
  3. You can give meaningful names to each Group or Step to ease identification.
The context menu for editing the Default Steps provides the following five options.
  • Reset - Resets all the selections and movements of the Step.
  • Reset movement - Resets only the movements of the entities that are part of the Step.
  • Rename - Enables you to provide an appropriate name for the Step.
  • Insert - Enables you to insert an additional Step.
  • Delete - Enables you to delete the Step.
The context menu for editing a Group provides the following three options.
  • Rename - Enables you to provide an appropriate name for the Group.
  • Insert - Enables you to insert an additional Group.
  • Delete - Enables you to delete the Group.