| 1 |
Select the entities you want to apply the transformation to.
If you click within the drawing/model other than on an entity and drag the cursor, the think3 application goes into
automatic window selection mode.
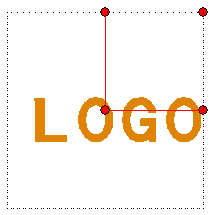
The set of handles is displayed (for details on the handles, see the description of the Scale Entities command).
To change the selected entities, right-click on Entities, select
Reset in the context menu and perform selection again.
|
| 2 |
Optionally, you can redefine the origin of the transformation, if the default one does not meet your requirements.
Default position of the origin
By default, the position of the origin depends on the selected entities.
| Selection |
Origin |
| Set of two or more entities |
Center of the viewport |
| Group |
Group Origin |
| Shared Group |
Group Origin — Axis Orientation same as the one used in the group definition |
| Arc/Circle |
Center |
| Curve |
If you clicked on the curve:
first endpoint, second endpoint or mid point, depending on which is closest to the point you clicked on. If you selected the curve without clicking on it (for example, using a window selection): first endpoint |
Selection by clicking
(remaining cases) |
The point you clicked on. |
|
To define a different origin, you can choose one of the following methods:
- Drag it to the desired position.
- Click on Handle Origin and specify another point.
- Right-click on Handle Origin, select
Reset in the context menu and specify another point.
|
| 3 |
Optionally, you can redefine the initial orientation of the axes, if the default one does not meet your requirements.
The X,Y and Z
X and Y axes are initially parallel to the corresponding axes of the
current Work Plane
coordinate system. To modify the orientation of the axes you can choose one of the following methods:
- Double-click on an axis and then click on the line you want to re-align it to.
- Use the items in the selection list:
- Click on X/Y/Z Axis
- Select Line,
2 points or
End Point In the drop-down list select
| Line |
to align the axis to a line. Select the line. |
| 2 points |
to align the axis to the direction identified by the two points. Select the two points. |
| End Point |
to align the axis so that its second endpoint coincides with a point. Select the point. |
|
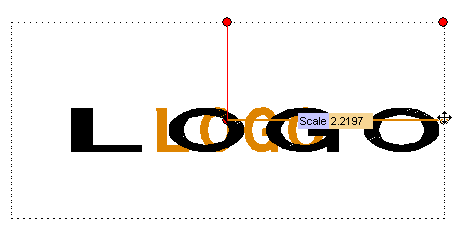
| 4 |
To scale the selected entities, drag the handle on the external vertex of the box until the preview meets your expectations, or type the scale value into the corresponding Scale box, which shows up as you click on the handle.
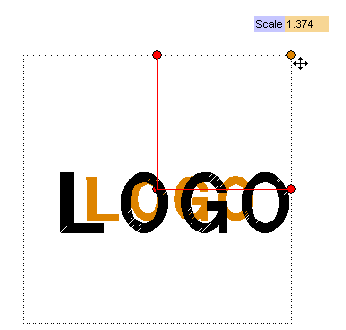
To undo the transformation you can check in the preview, before actually applying it and quitting the command, click the  button. button.
|
| 5 |
To stretch the selected entities, drag the handle on the corresponding axis end point of the box until the preview meets your expectations, or type the scale value into the corresponding Scale box, which shows up when you click on the handle.
To undo the transformation you can check in the preview, before actually applying it and quitting the command, click the button.
|
| 6 |
To make copies of the selected entities according to the defined transformation (rather than moving them), select the Copies check box and type in the number of copies to be created.
Click on More Options to expand it — you are enabled to apply geometric transformations to entities in the
model/drawing.
|
| 7 |
Click  or or  to confirm your selections and apply the transformation. to confirm your selections and apply the transformation.

Click  to discard your changes. to discard your changes. |