 New Catalog command enables you to create a new catalog in the selected index of your thinkparts catalog.
The  New Catalog command enables you to create a new catalog in the selected index of your thinkparts catalog.
You can find this command in the context menu of an index in the catalog tree frame of the Catalog Manager and in the toolbar of the command main dialog.
The command uses a simple three step wizard to guide you through the process of creating a new catalog:
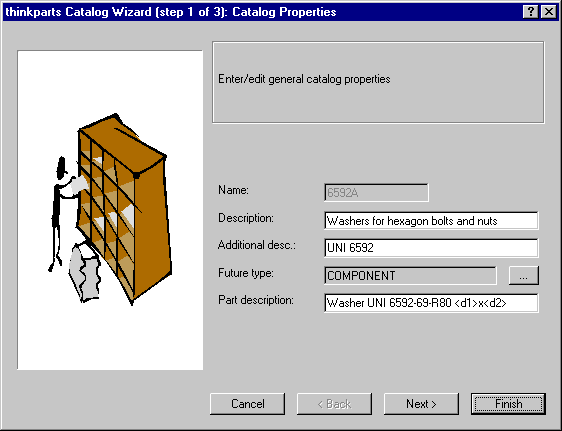
The dialog displayed in the first step enables you to edit the general catalog properties:

Enter the information in each field:
| Name | The catalog name, mandatory. If you enter the name of an existing catalog, thinkparts loads the relevant information in the remaining fields. The name is a text string of 14 or less characters. Since this is also the name of the physical folder where the data is stored, it must comply with your operating system file naming rules (i.e. it cannot contain any of the following characters: \ / : * ? " < > |). |
| Description | The description of the catalog that is displayed in the catalog tree frame. |
| Additional desc. | Reserved for future use. |
| Future type | The entity type that will pertain to the part when it will be imported as a think3 component. The default setting of this field is COMPONENT, however, if you have customized your thinkPLM installation with new entity types, you are enabled to use the ... button to select the appropriate one. |
| Part description | Enter the parametric description of the part. This will become the thinkPLM component description when you assign a part number. You may use attributes names enclosed in angular brackets; if you do, these will be replaced with their specific values in the component description. |
The buttons in the dialog have the following functions:
| Cancel | Closes the dialog and terminates the widget. |
| Back | Not enabled in this dialog. |
| Next | Moves on to the next dialog. |
| Finish | Not enabled in this dialog. |
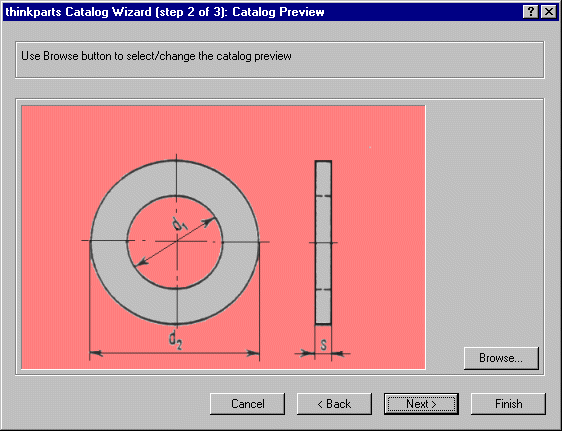
In this step you are enabled to define the preview image of the catalog:

Note that the dimensions indicate the key fields of the component: this visual information will prove useful to select the right component from the catalog.
Use the Browse button to navigate through your file system to locate the preview image of your choice. The image is a file in either BMP, GIF or JPEG format of any size that will be scaled to fit in the preview frames of the relevant thinkparts dialogs.
The buttons in the dialog have the following functions:
| Cancel | Closes the dialog and terminates the widget. |
| Back | Returns to the previous dialog. |
| Next | Moves on to the next dialog. |
| Finish | Not enabled in this dialog. |
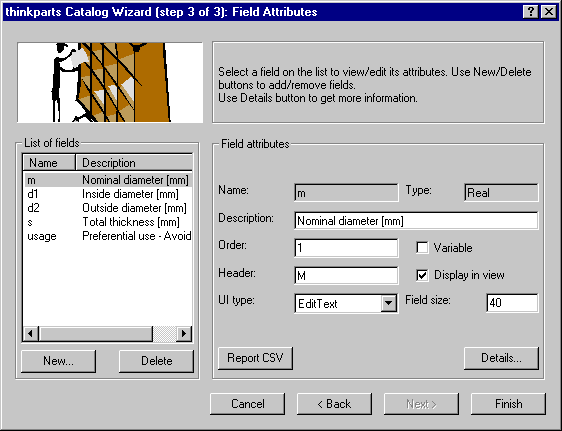
This dialog enables you to set the attributes of the fields used to define the geometric properties of the parts in the catalog:

With reference to the List of Fields, you can edit the attributes displayed in the Field attributes frame.
The buttons in the dialog have the following functions:
| New... | Adds a new field. Enter the appropriate field Name, Type and Length when prompted. |
| Delete | Deletes the selected field. |
| Report CSV | Uploads the contents of the current catalog to a file in CSV format. |
| Details | Enables you to edit secondary properties of the selected field; among these, the numeric format, the default value and the column size. |
| Cancel | Closes the dialog and terminates the widget. |
| Back | Returns to the previous dialog. |
| Next | Not enabled in this dialog. |
| Finish | Closes the dialog and creates the new catalog. |