Applying mirror constraints while surface editing
While performing surface editing using its control points, it is possible to apply constraints that will control the surface shape with respect to its virtual mirror. This would be useful in those designing processes where the symmetry is obtained by developing only half of the part and then mirroring it to get the complete part.
Open the Mirror_surf.e3 file available in the Samples folder of your installation and follow the steps given below to apply a mirror constrain about the XY-plane.
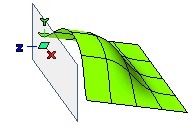
- For the purpose of visualization, activate the virtual mirror of the surface about the plane on which you intend to apply the mirror constraint. To do so, use the Virtual Mirror command.
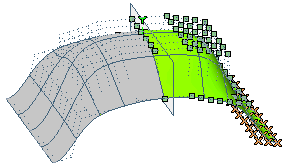
If need be, change the virtual mirror plane by using the Position: option in the Document Properties-View-Advanced category. For this tutorial it has been set to XY. The virtual mirror will appear as shown below.
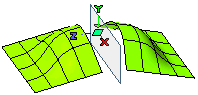
- Start the Modify Surface through Control Points command on the surface to be edited.
- You can select the Mirror mode check box to apply the mirror constraint on the surface (as per the default settings). However, if there is a need to change the default settings, it is advisable to select this check box after making the new settings.
- In the Set On drop-down list, select the position of the mirroring plane:
| XY plane |
The XY-plane of the coordinate system is the mirroring plane |
| XZ plane |
The XZ-plane of the coordinate system is the mirroring plane |
| YZ plane |
The YZ-plane of the coordinate system is the mirroring plane |
| Mirror plane |
The virtual mirror plane is the mirroring plane |
| Plane |
You need to define a custom plane to act as the mirroring plane by using the Reference Plane options. See the "How to define a plane" document for details. |
For the purpose of this illustration, it has been set to XY plane.
- In the Continuity drop-down list, select the kind of continuity constraint you want to apply on the surface:
| Position |
Positional continuity is maintained between the original surface and its virtual mirror |
|
| Tangent |
Tangential continuity is maintained between the original surface and its virtual mirror |
For the purpose of this illustration, it has been set to Tangent.
- Select the control points that you want to move to apply the mirror constraint. Note that it is necessary to select the first line of control points lying closest to the mirror plane. Now they will be automatically moved when the constraint is applied.
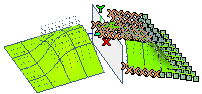
Note: To achieve the mirror constraint, the first line of control point HAVE to be present over the mirror plane.
- Additional options are available under the Advanced Options node.
The Projected continuity position option primarily controls the movement of the first line of control points.
- When the check box is selected, the first line of control points are projected normal to the mirror plane. The other control points are also moved accordingly to attain the mirror constraint.
- When the check box is cleared, the normal projection of the first line of control points onto the mirror plane is not guaranteed.
- After making the settings, select the Mirror mode check box. The selected control points will be moved to achieve the applied constraint. In this case, the surface maintains a tangential continuity with its virtual mirror.
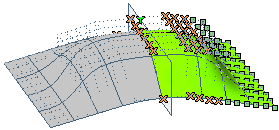
The virtual mirror surface has been highlighted in grey for visualization only.
- Due to the tangency mirror constraint, when the control points are further moved, the tangency is till maintained with its virtual mirror.
Note
If the mirror constraint cannot be applied under the prevailing conditions, then the Show Warnings ( ) button is available in the selection list. On selecting it, a warning will be displayed to inform you about the blocking issue. ) button is available in the selection list. On selecting it, a warning will be displayed to inform you about the blocking issue. |