 to view the preview).
 or
or  to confirm your selections and the electrode is created. The electrode is the solid in red as shown in the image below.
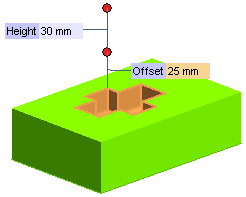
In the following tutorial you will create an electrode using the Mold Electrode command. Open the electrode.e3 file available in the Samples/mold folder present at the installation location and follow the steps given below.
to view the preview). or to confirm your selections and the electrode is created. The electrode is the solid in red as shown in the image below.