| 1 |
Check the Set Input box, so as to enable input through the Wacom® tablet and pen. In the drop-down list select
On XZ plane, so as to set the input plane to the World XZ plane.
|
| 2 |
Using the Set Target command, set the target to the appropriate position.

|
| 3 |
Check the Degree box under
More Options and set the curve degree to 2 (keeping the degree as low as possible enables you to create simpler NURBS).
|
| 4 |
Lay the pen onto the tablet so as to start sketching.

End sketching by moving the pen away from the tablet:

|
| 4 |
Click  to confirm the creation of your first curve. to confirm the creation of your first curve.
|
| 5 |
Re-orient the model so as to be able to create a new curve. In the drop-down list select On YZ plane, so as to set the input plane to the World YZ plane.
|
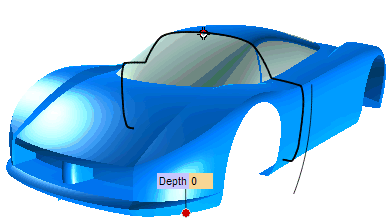
| 6 |
Check the Show Section so as to display the outline of the section obtained on the model by using the input plane. If the
Depth is not the right one, you can drag the handle until it matches your needs. Sketch your new curve.
|
| 7 |
Click  or to confirm your selections or to confirm your selections
Click  to discard your changes. to discard your changes. |