Click to confirm and the text will be created.

To create a true type font text, start the Text command and proceed as follows.
| Note: True Type fonts are available only in the 2D environment (Drawing). |
| 1 | In the Text box of the selection list, type the text you want to create and select the Tab key. |
| 2 | In the Height box, type the character height value and press the ENTER or TAB key. The dynamic preview enables you to check and modify this value at any time before specifying the final position. |
| 3 | Select the Entity Properties and choose the Text - Font & Frame category. |
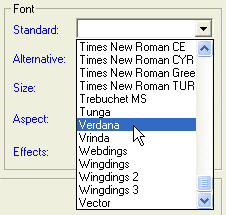
| 4 | In the Standard: drop-down list in the Font area, select the True Type font to be assigned to your text string. |
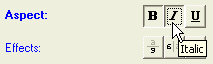
| 5 | Select the buttons corresponding to the style you want to apply to the text you are creating. For example, press B for bold and I for italic (and/or U for underlined) |
| 6 | Select the Set automatically check box in the Text - Font & Frame - Effects category. When selected, the program ignores the Character spacing: and Horizontal scale: settings. The resulting text looks exactly the same as text created using the selected TrueType font in any Microsoft® Office program. |
| 7 | Move the text to the position where you want to place it. Click to confirm and the text will be created. |