In this example, we would like to help you understand the process of creating your own style using the Organize Styles dialog box. Suppose you want to customize the Default dimension style to have all the text in blue color, we need to create a new Dimension style, T3: then you click on the New  in the Edit style area of the Dimension category and proceed as follows:
| 1 |
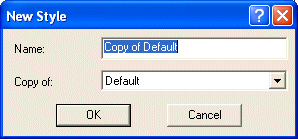
The New Style dialog box appears with a default name in the Name area, which you can change with any name of your choice.
|
| 2 |
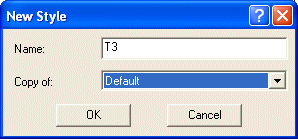
Here in this case type T3 is the new style name. The Copy of combo box allows you to select a style, whose configuration will be used as basic reference for creating this new style.
|
| 3 |
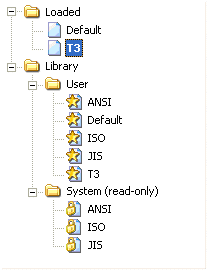
If you click OK, a new style is created with the name T3, and will be automatically Set as Current. The new Dimension style, T3 will be stored under both the Loaded and the Library style lists. And this style will have the configuration of the Copy of the selected style. In this case, it is Default.
If you click Cancel, the whole process is aborted and you will be taken back to the Organize Styles dialog box. |
| 4 |
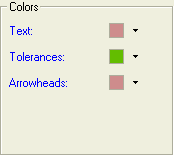
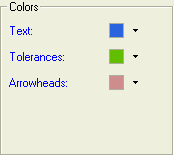
Choose the Dimension-Color category and change Text in the Colors group to blue.
|
| 5 |
Click OK to update T3 style. A dialog box is displayed so as to ask you whether the changes you made are to be applied only to the current document or to the library as well. |