 button (read Overview of the Capture & Playback interface).
The capture environment enables you to record a session in a log file and save it in a specified location in your local machine. The two Capture commands (highlighted in the image below) enable you to record to a log file all the actions performed during the application's working session, until you select the Stop  button (read Overview of the Capture & Playback interface).

 |
Record |
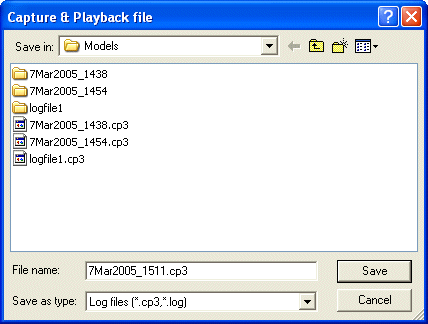
Starts a Capture session. The program displays a dialog box in which you should specify the name and location of the new log file to be saved. Now all the actions you perform are recorded to the log file, until you select the Stop command. |
 |
Append Record |
Starts a Capture session in append mode. All the actions you perform are appended to the existing log file, until you select the Stop command. Before starting the recording session, an automatic Playback of the current log file is performed, so that the recording session starts at the end of the current log file. |
A context tag file (a file with a ".ctx" extension created in a directory having the same name as the log file) is automatically generated containing all the context tags used during a Capture session.
|
Context Tags and the Context Tag File
and this is the context file you will automatically get if you capture the whole session:
[Head]

Test name             : 17Feb2009_1918
Description           :
Comments              :
Created with build    : 2009.1.108.490
Valid till build      :
Generated by          :
Company               :
Support Center        :
Class                 :
Origin                :
CPU Type              : pentium Model 2 Stepping 9
Performance indicator : 1290
Real Memory size      : 2047 MB
CPU Time              : 13s
Elapsed time          : 47s
Peak Memory Usage     : 206380 KByte
Page Faults           : 9521
Page File Size        : 194608 KByte

Level 1               : 0;0
Level 2               : 0;0


[Summary]

Weight   No.   Context used
     0;     1; "Feature" "Linear Sweep" "Protrusion"
     0;     1; "Arc" "Center"
     0;     1; "Work Plane" "Set on Face"
     0;     1; "Feature" "Linear Sweep" "New Solid"
     0;     1; "Rectangles & Polygons" "Rectangle"
     0;     1; "New Document" "Model"


[Details]

Line:299       "New Document" "Model"
Line:306       "Rectangles & Polygons" "Rectangle"
Line:315       "Feature" "Linear Sweep" "New Solid"
Line:348       "Work Plane" "Set on Face"
Line:351       "Arc" "Center"
Line:365       "Feature" "Linear Sweep" "Protrusion"
The [Head] section contains information about the hardware and software environment and customer data fields you can fill in if you need to send a Capture & Playback package to your Support Center.The [Summary] section contains all the context tags that were used during the session, ordered by their occurrence number (No.) and with the additional Weight information that will be useful to the Support Center. The [Details] section contains a list of all the context tags in the same order they were used during the session, preceded by the line number of the log file they were saved to. When the Create context tag file check box in the Playback options area is selected, another context tag file is generated when the Playback session is performed (a file with a ".ctr" extension created in a directory having the same name as the log file). The ".ctr" file has exactly the same structure as the ".ctx". A comparison between the ".ctx" and the ".ctr" files can be useful when debugging error situations. |
To record a session, do the following:
 button. The Capture & Playback dialog box is displayed, in which you can specify the log file name and location.
| Note If you attempt to perform an action that is not allowed by the Capture & Playback functionality, the message Action displayed if Capture & Playback is active will be displayed. Click OK to continue. |

To append a new session to an existing log file follow the steps
 button.
Before starting the recording session, an automatic Playback of the current log file is performed, so that the recording session starts at the end of the current log file.
 button.