Mating in ThinkDesign
 e-Learning Material: e-Learning Material:
A friendly set of e-Tutorial videos and documents on Assemblies and Mating has been created and is available on the Customer Care Corporate site (e-Learning home page). Take a look at the list of the available educational documents on Assemblies and Mating here: e-Learning: Assemblies and Mating.
Enjoy your lessons! |
The Mating environment has been changed with the goal of providing you with a brand new UI so that the operations of working with constraints is much easier and natural than it was in previous versions. The Multiple Mating is no longer available, since the new structure of the mating mechanism is much more flexible and much smarter, so that only one Mating command will manage the whole kinematic chain, also in the cases previously covered by multiple mating.
Note for the old users
Please take into account that since there is no longer a reference entity and an entity to be positioned, but both entities are involved symmetrically in the application of constraints, do not expect the first entity to be fixed as it was in older versions. To make it fixed, use the Fixed Constraint command.
|
General Information
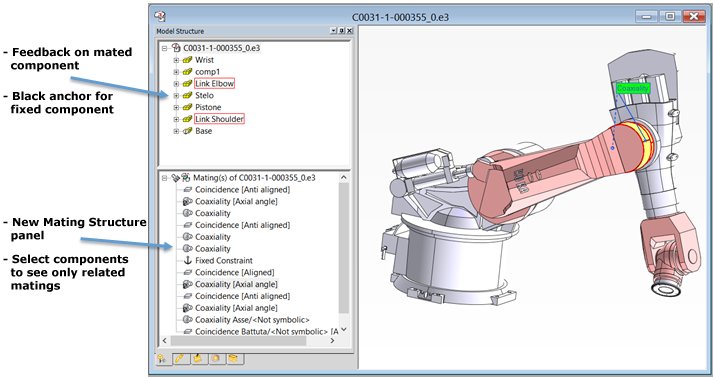
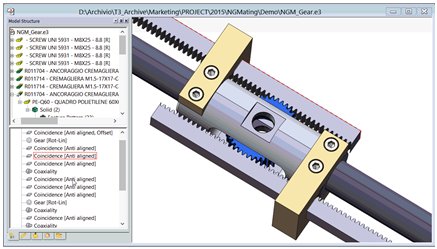
In order to make it easier for the user to understand the mating structure of an assembly, the mating events are represented in a separate window located below the Document Explorer window:
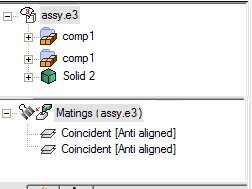
The separate panel mating contains all constraints belonging to the current hierarchal level: if a component is set as current, the contained constraints will be shown in the panel. All the constraints appear as children of the root node.
This type of representation enables you to understand information about constraints and positioned parts in a very smart and friendly way.
Old Assemblies and Compatibility
If you load a model containing mating events created with prior versions of ThinkDesign, they will be automatically converted to the new mating structure. So, even if you do not perform any action on the model, when you close it you will be asked whether to save it with the new mating structure. Obviously, if you need to use it with older versions of the package, do not save it. The new mating structure is not supporte in older versions, so we recommend making a copy of the file if you need to use it in such versions, or to be very careful not to save it with the current version.
|
Constraints are no longer asymmetric (no more Positioned and Reference objects), but only a symmetric pair of entities. Instead of implicitly having the reference object fixed (but only with respect to the object positioned on it), the fixed property is directly selectable by the user. So when adding a constraint between two objects, both will be able to move, unless one of them is explicitly set as fixed by the user.

New Features
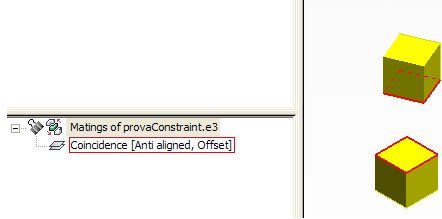
When passing the mouse on constraints, the involved geometric-entities are highlighted in the graphics area with a red border. Similarly, a red colored box will appear over constraints.
The double-click is active on constraints so that it will run the default action present in the context menu: Redefine.
In case of flexible components, where a kinematic chain could be defined by some constraints that exist in different levels, you can understand where a constraint actually is defined: the name of the containing component will show up in the list of info appearing when the Info item is selected in the context menu.
Constraints belonging to levels different from the current one are displayed in blue characters and cannot be edited. They can be edited only if the relative component is set as current.

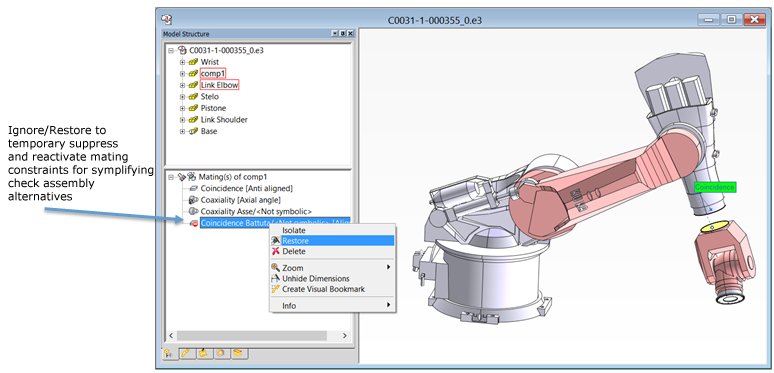
Ignoring Constraints
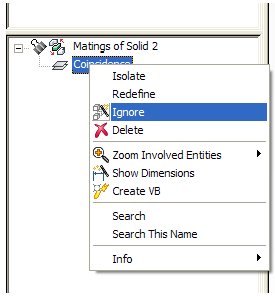
A specific context menu item (Ignore) will be available so as to temporarily suspend constraints (an over icon represents this particular status in the left panel). In this way, you can freeze some constraints and then intervene on the model as if these constraints were not present. At a later stage, you can either unfreeze them or delete them completely as you prefer.
Once a constraint has been ignored, the Restore command is available in the menu to restore it to its prior status.
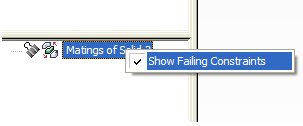
Failing constraint management
You are easily enabled to filter failing constraints. This can be done via context menu on the Mating Structure root node. The user should be able to easily filter for failing constraints.
Therefore, the only item appearing in the context menu for root node will be as shown below:
Interaction between Model Structure and Mating Structure
In order to improve the possibility to find constraints related to particular entities and vice-versa, it is really important to have a strong relation between the Model Structure and the Mating Structure. The time spent to move the cursor from the Model Structure to the Mating Structure and vice-versa has therefore been minimized.
Interaction from the Model Structure to the Mating Structure
When you click on any entity in the Model Structure, if the corresponding entity has an associated Mating event, the related constraints of that mating event are displayed in the Mating Structure.
The display of the constraints in the Mating Structure follows the following rules:
Top Level Current + click on the Model Structure root:
- All the constraints in the top level will be shown in the Mating structure, in normal characters
Top Level Current + click on Solid/Component in the first level of the Model Structure:
- The related constraints of that Solid/Component are shown in the Mating Structure, in normal characters
Top Level Current + click on Solid/Componet in inner levels of the Model Structure:
- The related constraint will be shown in the Mating Structure, in grayed characters
Current Component + click on it in the Model Structure:
- All the constraints in this level will be shown, in normal characters
Current Component + click on a "first level" solid/component in the Model Structure:
- The related constraint will be shown in the Mating Structure, in normal characters
Current Component + click on an inner solid/component in the Model Structure:
- The related constraint will be shown in the Mating Structure, in grayed characters
Current Component + click on an outer solid/component in the Model Structure:
- The related constraint will be shown in the Mating Structure, in grayed characters
Normal characters mean that the constraint belongs to the current level of the component hierarchy. This means that you can redefine it.
Grayed characters mean that the constraint belongs to a different level of the component hierarchy. In this case you can redefine this constraint by automatically setting as current the component where the constraint lies.
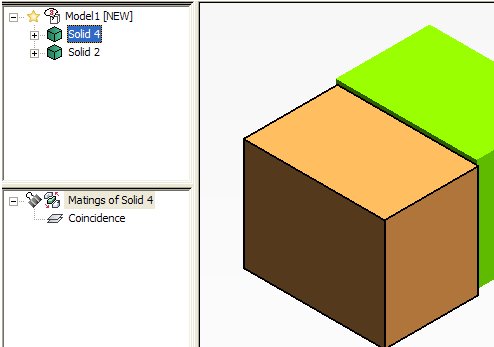
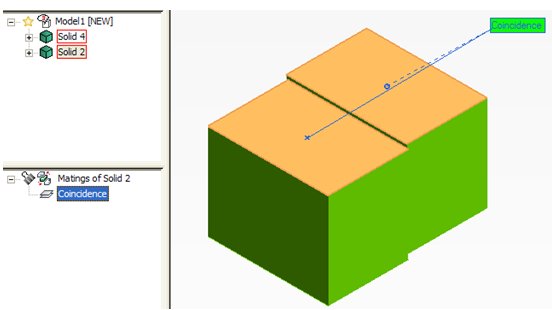
Interaction from the Mating Structure to the Model Structure
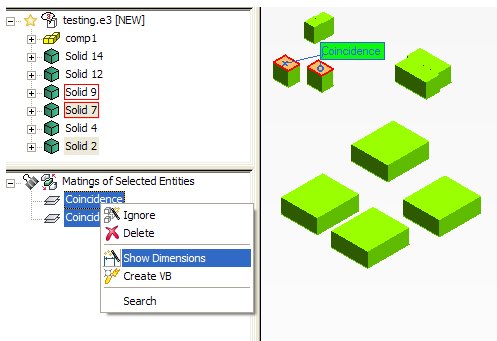
When selecting a constraint, the constraint is highlighted in the graphics area and the related mating entities (not geometric, but the containing entities) are bounded by a red border.
Mating Structure Contextual Menu
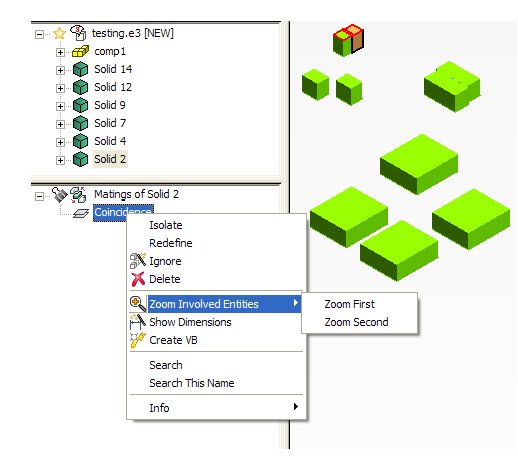
When you right-click on any of the constraints, you will get the following Context Menu
When a multiple selection is performed, instead, the following context menu is displayed.
You can:
- Zoom the First and Second Entities for the given constraint
- Redefine a constraint
- Ignore/Restore constraints, that is temporarily suspend and unsuspended given constraints. Please note that the suspension of a constraint does not change the status of a constraint, so it will not repair it if it was failing/conflicting before.
- Delete one or more constraints
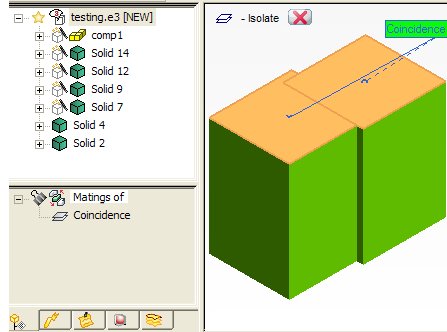
- Isolate a constraint
- Create a Visual Bookmark that keeps as visible only entities involved in selected constraints
Interactions with the Graphics Area
When you select an entity from the Graphics area, the corresponding entity will be as usually selected in the Model Structure, and if there is an associated constraint, it will be displayed in the Mating Structure.
When commands like Redefine or Isolate are executed, that means that nothing is selected in the Model Structure, hence if nothing is selected in the Model Structure, nothing should appear in the Mating Structure, but since it is "frozen" it will retain its current status until the exit of the command.
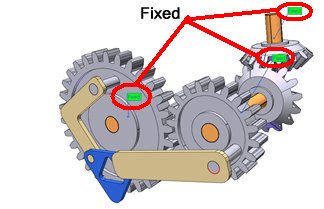
Fixed Constraint
To fix an entity in the space, so that it cannot move in any direction, in order to prevent you from dragging/moving solids and components, use the Insert SolidFix constraint.
To make it movable again, use InsertSolidUnfix.
Gear Constraint
The new Gear constraint enables you to apply one of the three following constraints:
- Rotation-rotation
- Rotation-linear
- Linear-linear
which constrain the entities they are applied to to the type of movement indicated.
This type of constraint is availalble mostly for the management of mechanisms such as the rack-and-pinion steering, and to mate gears.
e-Learning on Assemblies and Mating