When you create/modify a Visual Bookmark, you specify which sets of parameters must be captured, among a wide range.
This document explains how you can create a Visual Bookmark by listing the whole set of parameters provided by the New Visual Bookmark command.
| 1 |
In the Name box, insert the Visual Bookmark name by moving the cursor over the box and typing the name of the bookmark you are creating.
Uniqueness rules for Visual Bookmark names
It is not possible to have different Visual Bookmarks with the same name, even though they belong to different categories. Please note that the Visual Bookmark name check is case sensitive (that is, for example: ABC is different from abc). Thus Visual Bookmark names with the same letters and different cases will be considered different. |
In actual fact, you might not assign a specific name to your bookmark. In this case, it would keep the default name, Bookmark1. The number increases progressively as you keep on creating new bookmarks with the default name.
Switching to the following options and scrolling the Selection List
As a general rule, switch to the following option by moving the cursor over it.
Please note that if the height the Selection List is beyond the graphics area, you can scroll up and down the Selection List to reach the desired items using the specific arrows:  , ,  . .
If you hold down the SHIFT key when clicking the arrows, you will scroll five items at a time instead of just one. |
|
| 2 |
Wishing to include the bookmark in a category, click on
Category to expand it. Select the category name from the drop-down list, in case you choose an existing category, or introduce a new one by selecting
New Category and typing its name in the following
Name box.
|
| 3 |
In the Keywords box, type the keywords (separated by a comma) you want to associate to the Visual Bookmark, if you wish to search for the bookmarks by keywords and bookmark names from the
Filter: box on top of the
Visual Bookmarks Panel.
|
| 4 |
The Description option enables you to insert a description associated to the Visual Bookmark. Click the option and type the description in the dialog box that is displayed.
|
| 5 |
By clicking the Capture Settings option, the following parameters are displayed:
| View Data |
When you select this option, the Visual Bookmark captures the information restoring the viewport that you are currently viewing. |
| Rendering Mode |
When you select this option, the Visual Bookmark captures the information on the display mode used in the view. This option only applies to models. |
| Layers |
When you select this option, the Visual Bookmark captures the information on the visible layers. |
| Hide/Unhide Entities |
When you select this option, the Visual Bookmark captures the information on hidden and visible objects. |
| Work Plane Position |
When you select this option, the Visual Bookmark captures the information on the current position of the Work Plane.
|
|
| 6 |
By clicking More Options, the following additional options are displayed:
| Fit View |
When you select this option, the model/drawing fits exactly within the current display. |
| Light Representation |
When you select this option, the Visual Bookmark captures the information on X-Reference components in Light Representation. This option only applies to models. |
| Annotation View Mode |
When you select this option, the Visual Bookmark captures the information on the display Annotation mode. This option only applies to models. |
| Activate/Deactivate Features |
When you select this option, the Visual Bookmark captures the information on activated and deactivated features. This option only applies to models. |
| Spreadsheet Variables |
When you select this option, the Visual Bookmark captures the information restoring the values of all Spreadsheet variables encountered. |
| Clipping Plane |
When you select this option, the Visual Bookmark captures the information on the Clipping plane activation mode. This option only applies to models. |
| Load/Unload Components |
When you select this option, the Visual Bookmark captures the information on loaded and unloaded components. This option only applies to models. |
| Load/Unload Shared Groups |
When you select this option, the Visual Bookmark captures the information on loaded and unloaded shared groups. This option only applies to drawings. |
| Recursive Capture |
When you select this option, the Visual Bookmark propagates to all the lower assembly levels, in 3D environment or nesting levels, in 2D environment.
|
|
| 7 |
The New Entities option, only visible when you've selected some of the previous options (
Layers,
Hide/Unhide Entities
,
Annotation View Mode,
Activate/Deactivate Features,
Load/Unload Components or
Load/Unload Shared Groups), includes the following options:
| Layers |
Enables you to define the visibility of the entities that are created on new layers that will be added after the Visual Bookmark creation. You can choose among the following options:
| Current status |
Visibility of the entities will depend on the visibility status of the layer at the time of activating the Visual Bookmark |
| Hide |
Entities on the new layers are hidden |
| Unhide |
Entities on the new layers are visible |
|
| Annotations |
Enables you to define the visibility of the new annotations that will be added after the Visual Bookmark creation. You can choose among the following options:
| Current status |
Keeps the current status |
| Hide |
Annotations are hidden |
| Unhide |
Annotations are visible |
|
| Components |
Enables you to define the status of the new components that will be added after the Visual Bookmark creation. You can choose among the following options:
| Current status |
Keeps the current status |
| Load |
Components are loaded |
| Unload |
Components are unloaded |
|
| Groups |
Enables you to define the status of the new groups that will be added after the Visual Bookmark creation. You can choose among the following options:
| Current status |
Keeps the current status |
| Load |
Groups are loaded |
| Unload |
Groups are unloaded |
|
|
| Visibility |
Enables you to define the visibility of the new entities that will be added after the Visual Bookmark creation. You can choose among the following options:
| Current status |
Keeps the current status |
| Hide |
Entities are hidden |
| Unhide |
Entities are visible |
|
|
| Features |
Enables you to define the status of the new features that will be added after the Visual Bookmark creation. You can choose among the following options:
| Current status |
Keeps the current status |
| Activate |
Features are activated |
| Deactivate |
Features are deactivated |
|
|
| 8 |
Click  or or  to confirm your selections and create the Visual Bookmark. to confirm your selections and create the Visual Bookmark.
Of course, since the bookmark is a snapshot of the model/drawing visual status, when you require, for instance, to store a detail of your current viewport in the bookmark, remember to zoom in before applying the
New Visual Bookmark command.
Click  to discard your changes. to discard your changes. |
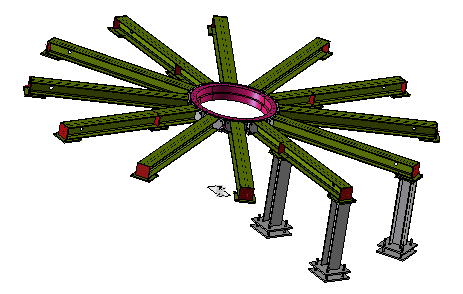
Here is an example of how Visual Bookmarks can be created simply to store information on two details within a complex model.
Starting from a storage bin containing ice to be dispensed to fishing-boats along the quays in a harbour and, in particular, from its base structure:
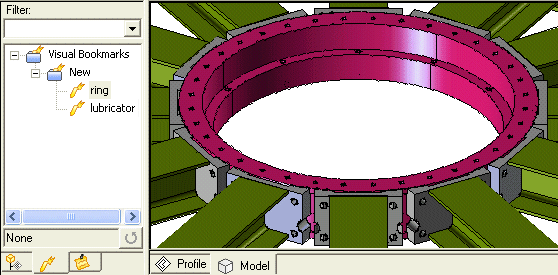
A Visual Bookmark named ring, where only the View Data option is selected, shows the ring detail:
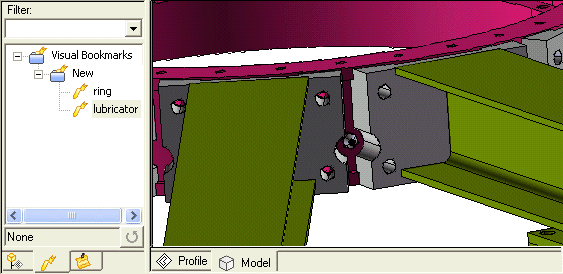
while another Visual Bookmark named lubricator, created as the previous one, shows the other detail: