

Tools Info
Info Check Design Differences
The Check Design Differences command enables you to compare two (nearly identical) solids, surfaces or skins for analyzing small differences between them. It can typically be used to detect presence of any relative bulge, compute distances between areas having differences or find the modifications applied over the skins.
See the example below; in 1, there are two overlapping skins (purple and grey) having some differences. For the purpose of visualizing the differences, the skins have been shown separately in 2 and 3. The noticeable differences have been highlighted in red circle. However, there are other minute differences that are not visible by naked eye. The Check Design Differences command is useful to locate these differences.

The comparison is made between two sets of entities selected for the First Entities and Second Entities selectors, respectively. It is necessary that both set of entities should be present at the same absolute location in the Absolute Reference System (World), as shown for 1 in the image above. Since they will be overlapping with each other, either you can hide one of them after making the first selection, or make the selection from the Model Structure.
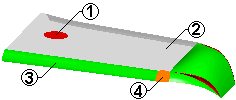
Once the selections are complete, select the Preview ( ) button to start the computation process. The results of the computation are visible in the Graphics Area over the entities in stipulated colors, as shown below.
 |
1 - New face (red) |
| 2 - Face with no difference (grey) | |
| 3 - Face with some difference (green) | |
| 4 - Face currently highlighted having difference (orange) | |
| Note that the colors are displayed as per the color Set defined in Colors and Materials. | |
In the Threshold edit box you can define the minimum value above which the differences are highlighted.
Use the Exchange Entities check box to change entity selection sequence.
The First modified entities node enables you to specify entities over which the differences are to be highlighted. This node is a drop-down list from which you can select:
If more than one difference is found you can use the Next Group and Previous Group ( ) buttons besides Entity to highlight, one by one, the entities having differences. The differences present on the highlighted entity are analyzed by Check Local Differences. You can also directly select the entity on which you need to view the local difference for the Entity selector.
The Check Local Differences check box enables you to view specific difference values for the highlighted entity.
The Max. presumed distance edit box enables you to specify the maximum difference value above which the differences will NOT be highlighted.
Additional options are available under More Options.
The Zoom entities check box enables you to view the currently highlighted entity up-close:
 ) buttons, the view will change to provide maximum zoom on the entity getting highlighted.
In the Surface sampling density edit box you can enter the number of sampling points per mm2 that will be used for the calculation of differences.