Customizing a Dimension Properties toolbar
The procedure that follows shows you how to use the
New Toolbar Object command to add the text
Size: property to a Dimension Properties toolbar with all object type variants applicable to a text box.
If you have actually tried the Creating a new Dimension Properties toolbar example, you should have a toolbar named TB01. If so, make sure it is displayed; if not, display and use a Dimension Properties toolbar of your choice when you find references to TB01 in the following text.
- Select
 Options/Properties from the menu bar.
- Select the Entity Properties tab and expand the options tree frame to display the
Font & Frame subcategory.
- Right-click the Size: edit box under the
Font area and select
New Toolbar Object from the context menu.
- In the New Toolbar Object dialog box that opens, click
 to uncover the
Toolbar area and then select the toolbar TB01 from the
Name: drop-down list. You will add edit box/drop-down list/button to this Dimension Properties toolbar.
to uncover the
Toolbar area and then select the toolbar TB01 from the
Name: drop-down list. You will add edit box/drop-down list/button to this Dimension Properties toolbar.
- In the Object type: area, select the
Edit box radio button and then click
OK. The following edit box is added to the TB01 Dimension Properties toolbar (the default numeric value may change depending on your current setting).
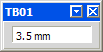
To change or set the new text height value, applicable to dimensions and texts, enter the new value in the text box.
- Again, right-click the Size: edit box and select
New Toolbar Object to add the same property in a different way. Click to uncover the
Toolbar area and then select the toolbar TB01 from the
Name: drop-down list.
- This time select the Selection from list radio button from the
New Toolbar Object dialog box and then click
OK. The TB01 Dimension Properties toolbar should look similar to the following: (you may have to drag the side of the toolbar to elongate it)
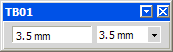
To change or set the new text height value, select the Edit option from the drop-down list. The
Edit List Values dialog box is displayed. You can change or add new values and click
OK. The modified and new values will be displayed in the drop-down list. Now you can make a selection among them.
- Once again right-click the Size: edit box and select
New Toolbar Object to add the same property in a different way. Click to uncover the
Toolbar area and then select the toolbar TB01 from the
Name: drop-down list. This time add it to your toolbar using the
Fixed option radio button. Note the following:
- When you select this option, the button preview appears and by clicking on it you are enabled to edit the button label.
- The text height value is the value of the property when you started the New Toolbar Object command. If you need a different one, start again the command and set the property value first.
- The button enables you to set the property value to one single value, while the other types enabled you to set it to any value you needed.
The toolbar should now display the following controls.

When you click the new button, you set the text height property to the value displayed. This may be useful to reset the relevant property to a standard value. Note that you are enabled to add other buttons with different values.
- In order to align the objects in the toolbar, you can use the Use Block to Align command. This command enables you to insert non-functional blocks of various sizes that are designed to serve as place holders or separators for the alignment of the objects in the toolbar. You can find it in the context menu that the program displays on right-clicking on the Dimension Properties toolbar when the
Customize dialog box is open.
- If you need to, you are enabled to add any standard button with the Customize command. The peculiar behavior of the Dimension Properties toolbar, however, is limited to dimension and text properties. Other commands eventually added to the toolbar show their normal behavior even when applied to dimensions and texts.