The Surface Tension command enables you to apply a controlled deformation to a shape by applying tension to the normal curvature along some controlling curves on the shape. Note that the normal curvature is the curvature computed on the plane formed by the tangent to the controlling curve and the normal to the surface along the same curve.
Tension is a characteristic of a curve related to curvature and controlled through a real value, in our system varying from -1 to +1:
- The higher the tension value in a certain region, the lower the curvature (and obviously the higher the radius of curvature).
- The lower the tension value in the same region, the higher the curvature (and the lower the radius of curvature).
As mentioned above, the normal curvature along some curves on the selected shape will be modified by applying the tension value to it, similarly to what happens when using the Curve Tension command. You will be enabled to select several groups of controlling curves on the shape, and to apply different tension values to the normal curvature along them.
The command executes a process based on an optimization, so as to produce the best possible results. Therefore, the optimization process itself can require some minutes to complete.
Similarly to the
Advanced GSM command, you will be enabled to select:
- The type of entities to which the modification is to be applied, in the Entities drop-down list under
Entities to Be Modified:
- One or more sets of constraints to be applied with the goal to preserve the geometry of some parts of the model, under the Preserving node. In the
Preserving drop-down list you can choose the type of entities to be preserved:
- Curves
- Points
- Virtual vertices
For each Group of entities to be preserved, you can set the type of constraint to be applied by selecting the corresponding item in the
Constraint drop-down list in terms of position, tangency, curvature and so on. Please refer to the documentation of the
Advanced GSM command for further details.
- Under the Tension node, you can set several groups of curves along which the tension value for the surface must be modified.
- You first select the curves (Curves) along which the tension value should be modified. Note that these curves must be of the Curve on Surface type. Also note that each base surface of these curves is required to be part of the surfaces to be modified.
- In the No. of points box specify the number of points to be taken into account along a given controlling curve when computing the modification. The higher the number, the more precise the computation and (generally) the longer the time required.
- In the Roundness box, type the value of roundness. According to this value, the modified surface will be more or less "round" along a given controlling curve (see "Examples of the Roundness parameter" in the documentation for further details). A useful suggestion is to generally use a much bigger value than the one used as global roundness (see
Shape Control under
More Options).
- Under the Zone Parameters node, you can define the tension parameters for a
Start Zone and/or for an
End Zone.
In both cases, first of all you can define the part of the curve (and thus of the surface) to be affected either by dragging a specific handle or by supplying the corresponding curve parameter value in the associated mini-dialog box.
- In the Start Zone/
End Zone drop-down lists, select:
| None |
No start/end zone is defined. |
| Preserved |
To prevent the normal curvature of the surface(s) along this part of curve from being affected. |
| Controlled |
To apply the modification to the normal curvature of surface(s) along this part of the curve.
Please note that all the remaining parts of the curve (the ones not included in the start/end zone), will be affected by the modification but without being controlled. |
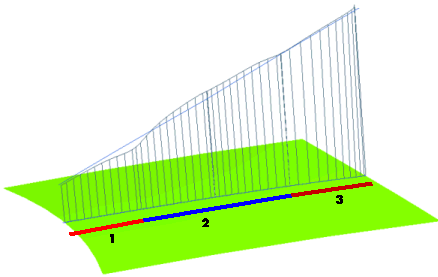
The following image shows the curvature plot before and after applying the surface tension modification. The blue straight line is the plot before applying the command, while the other one, in which you can easily distinguish the three different areas, is the plot after the modification (area 1 was set as controlled, area 3 as preserved).
- Define the Start Tension Value/
End Tension Value. As stated previously, these values can vary from -1 to +1.
- Some further options are available under More Options.
- The Copy box enables you to choose whether to modify the original entities or to apply the change to a copy.
- When the box is checked, a copy of the selected entities will be made and the controlled modification will be applied to the copy, so that the unchanged original entities are still there in the model along with the new ones the modification has been applied to.
- When the box is cleared, the controlled deformation will be applied directly to the original entities you selected.
- The Hide check box enables you to manage the visualization of the original entities during the editing session.
- When the box is checked, the original entities are hidden during the editing session.
- When the box is cleared, the original entities are visible during the editing session, along with the modified ones.
- The No. of iterations enables you to type in the maximum number of iterations allowed in the optimization process. If this number is too small, the process will stop before reaching the best possible solution.
- The Approximation item enables you to obtain NURBS entities rather than special type entities. See "Get NURBS surfaces instead of specialized ones" in the documentation for further details.
- The Precision item enables you to define the precision values to be achieved during the computation. See "Setting the precision values to be achieved" in the documentation for further details.
- The Shape Control item enables you to manage the parameters that the shape of the final surfaces. See "Set the parameters controlling the shape of the resulting surfaces" in the documentation for further details.
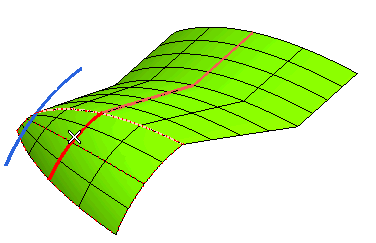
In the following example, see the curvature plot of the base surface along the red COS curve, computed using the Curvature command:
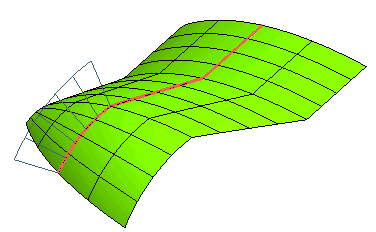
Create the curvature plot curve by checking the Base surface curvature box.
- Start the Surface Tension command.
- In the Entities drop-down list under
Entities to Be Modified, select
Surfaces.
- Select the surface to be modified.
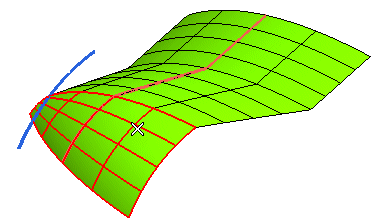
- Now, in the Preserving drop-down list under
Preserving, select
Curves and then click on the red curve as in the following image:
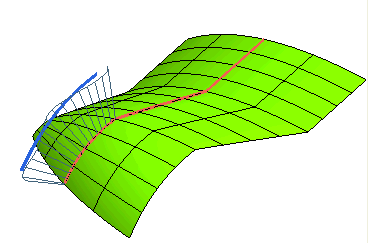
- Click Curves under
Tension and select the red curve as in the image below:
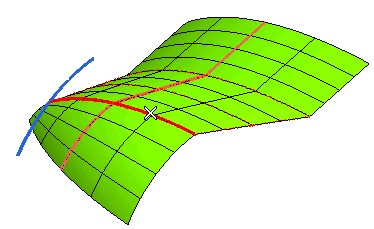
- Set the values for the starting and end zones to the ones shown in the following image and set the tension value to 0.1.

- If you apply the command and recreate the curvature plot, you will see the following differences:

 Surface