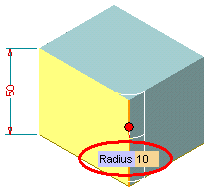
A mini-dialog box is an input box positioned exactly on the corresponding geometric item of which you might want to change the proposed size or some geometric property:

You can use mini-dialog boxes as usual interface controls. For example:
A preview mechanism displays the geometric items modified according to the new value you typed in.
To confirm the value you typed in a box, do one of the following:
One of all the existing mini-dialog boxes is the current option, that is the one which you can perform actions on. You can recognize the current option very easily by its background color.
When you are editing a mini-dialog box, you can move to the next mini-dialog box using the TAB key (or explicitly clicking on them with your mouse). The first time you Press the TAB key, the value that is currently displayed in the mini-dialog box will be acquired. Press the TAB key a second time to move to the next mini-dialog box. The mini-dialog box you move onto becomes the current option.
Use SHIFT+TAB to move to the previous mini-dialog box rather than to the next one.
Some additional actions can be performed on the current option just by right-clicking and selecting the options of the context menu:
In a number of situations when a geometric item can be modified either in size or direction or in both, a handle is also displayed together with the mini-dialog box. You can drag the handle about in order to interactively change the size of the corresponding geometric item, thus having to explicitly indicate no numeric value. While you move the handle, the mini-dialog box will display the updated numeric value of the corresponding geometric item, in a way which depends on the grid settings (see the Grid category of the Document Properties).
From time to time, the presence of the dialog boxes may constitute an obstacle in the evaluation of the geometry; in this cases it may be useful to use the Hide Minidialogs and
Show Minidialogs commands to temporarily conceal them.
Alternately, you can drag and drop the mini-dialog boxes away from the geometry it is obstructing. To do so, click the left mouse button on the mini-dialog area, hold it down and drag the mini-dialog to a new position; release the mouse button when the position is reached. The result of the above mentioned feature is shown in the image below:

Please note that the mini-dialog will return to the default position if:
For further details on the use of handles, see "Symmetry and Invert Direction handles".