A Print Setup Roadmap
The printing tools available in the think3 application offer you multiple solutions to your printing needs. This roadmap is intended to give you a quick access to the print setup documentation.
Note
Both the Print and Print Setup commands enable you to access the same print configuration utilities that are organized in tabs. Please note that the description below applies to both the commands. |
The printing methods available are:
Online printing
Online printing is achieved when the Batch option is not selected. You can print the current think3 document, in two ways:
- Print mode - to print the document with full control on all print setup parameters and maximum output quality: in this case, the following categories are available to set the print options:
- Printer — that contains the parameters relative to the output device or file;
- Page — that contains the options to control scale, widths, layers and such;
- Margins — where you find the controls on print and paper margins;
- Print parameters — contains the options that control parameters that are be printed or not.
- Hardcopy mode - to dump a screenshot to your printer for a quick hardcopy of what you see on the screen: in this case, the following categories are available to set the print options:
- Printer — that contains the parameters relative to the output device, format or file;
- Page — where you find the way to set the screen area to print, the scaling and background color.
Printing to files
Instead of plotting to an on-line printing device, both in the Hardcopy and in the Print mode, you can print to a file; when you select the Print mode, you can use several special formats. This will enable you to exchange data with other systems or to print at a later stage on devices that are currently off-line. |
Transparent settings for Print and Hardcopy modes
The changes made in Print and Hardcopy modes are transparent to each other. That is, changes made to the settings in one mode will be reflected in the other mode as well. However, there are some cases, where there are some exceptions to this transparency.
Device Selection
You can select the device type for the Hardcopy mode. You can select the required device from the Name: drop down list of the Print Setup dialog box. This setting is transparent. That is, the device changes made in the Hardcopy mode will be automatically reflected in the Print mode and vice-versa.
Paper size:
You can select the paper size for the Hardcopy mode. This setting is transparent. That is, your setting will be applied to Print mode as well. For example, if you change the paper size to A4 in Hardcopy mode, the same information (size A4) will be set in the Print mode as well and vice-versa.
Print to file
The Print to file setting and its File type: and AutoNumber options are available to an image printer device, for Print as well as Hardcopy mode. However, unlike the other settings described above, the Print to file setting is not transparent between Print and Hardcopy modes. That is, if you change the Print to file settings in Print mode, the changes will not be applied to the Print to file settings in Hardcopy mode and vice-versa.
Print device specific settings
There are some print device specific settings, such as:
Print resolution setting
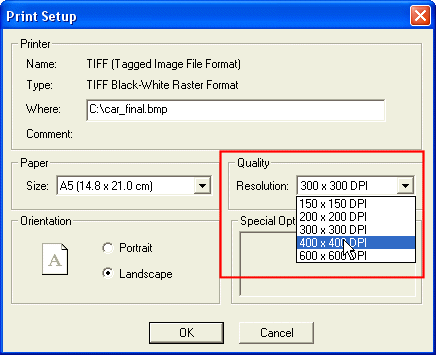
You can set the print resolution for the default supplied plotter and image devices (for HPGL plotters, TIFF and so on). For plotter devices you can set the resolution in pixel or mm. For other devices the resolution can be set in DPI (Dots Per Inch) units.
To set the resolution settings, click the  button to open the device specific Print Setup dialog box and make the required selection in the drop-down list.

Custom format
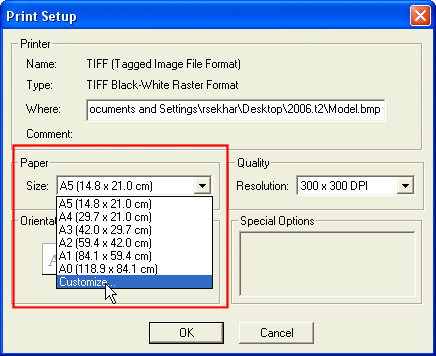
It is possible to manage a custom paper size format:

Select the Customize option from the Size: drop-down list.
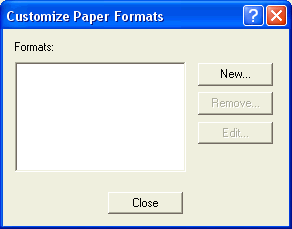
The Customize Paper Formats dialog box will be displayed.

Click the New button to create a new custom setting. Also make use of the Remove or Edit buttons to remove or edit the settings respectively.
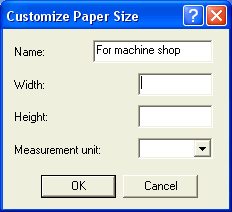
The following image shows the Customize Paper Size dialog box where you can create a new custom setting.

Enter the data for the corresponding fields and click OK. Now this custom format will be available in the Size: drop down list of the Print Setup dialog box.
Batch printing
Batch printing requires thinkprint and is enabled by checking the Batch checkbox in the print or print setup dialogs.
You can configure the think3 application for batch printing by properly setting up the following categories:
- Printer — that contains the parameters relative to the thinkprint virtual printer to use;
- Page — that contains the options to control scale, widths, layers and such.
Related Topics


