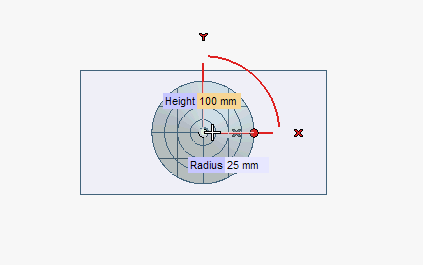
| Base center | The point you specify will be the center of the cone base. |
| Center of mass | The point you specify will be the center of mass of the cone. |

At any time during the creation of the cone, you can:
- Change the position of the placement point just by clicking in a different position.
- Change the orientation of the cone. The three arcs represent the three angles of rotation (about each of the three orthogonal directions). You can rotate the cone about an axis by dragging the corresponding arc or by typing the value of the rotation into the Angle box which shows up when you pick the arc.
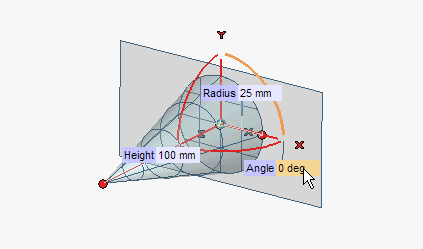
You can also use the X Axis, Y Axis, Z Axis drop-down lists under Axis Alignment:Line to align the axis to a line. Select the line. 2 points to align the axis to the direction identified by the two points. Select the two points. End point to align the axis so that its second endpoint coincides with a point. Select the point.

By double-clicking on the appropriate red circle marker, you can also invert the direction of the cone.
| Minor radius | To truncate the cone by specifying the value of the second base radius. A Minor Radius mini-dialog box is displayed. Type in an appropriate value or define it interactively by dragging the corresponding handle.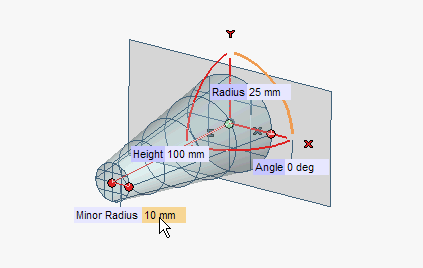 |
| Vertex angle | To truncate the cone by defining its vertex angle (given the cone height, the angle formed by the axis of the cone and by its generatrix). A Vertex Angle mini-dialog box is displayed. Type in an appropriate value or define it interactively by dragging the corresponding handle. |
| Taper ratio | To truncate the cone by defining the tangent of the vertex angle (which is also the ratio between the difference major radius/minor radius and the height). Type the appropriate value in the Taper ratio box. |
In this task, select the Minor radius method and proceed as described in the illustrations above.
- When the box is checked, the resulting entity will be a parametric solid. A drive dimension will be associated with the radius of then base of the cone and another one with the cone height. Depending on the construction method, if a truncation has been set, a drive dimension will be associated with the radius of the minor base of the cone or with the vertex angle, while, if the truncation is set through the taper ratio, the latter can be redefined using the Redefine Feature command. The icon of a solid will be displayed in the Model Structure.
- When the box is cleared, the final result will be the surfaces composing the shape.
 or
or  to confirm your selections and actually create the solid.
Click
 to discard your changes.