 ) in the selection list, ensure that the
Show Rebuild Step by Step in selection list box is checked in the Construction category of the System Options.
) in the selection list, ensure that the
Show Rebuild Step by Step in selection list box is checked in the Construction category of the System Options.
 ) from the dialog box to start the Rebuild Step by Step process.
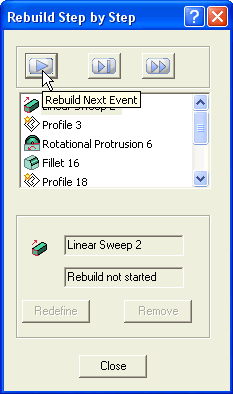
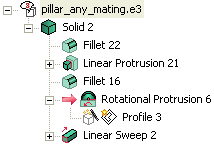
You can repeat this process till all the features have been rebuild. The feature that has been rebuild is displayed in the graphics area. A red arrow ( ![]() ) is displayed in the model structure besides the name of the feature that will be rebuild next.
) is displayed in the model structure besides the name of the feature that will be rebuild next.
 ). The model gets rebuild till the selected feature in a single step.
 ) at any stage of the Rebuild Step by Step process to rebuild all the features of the model in a single step. The fully rebuild model will be displayed as shown below.
Finally choose the Close button to close the Rebuild Step by Step dialog box.