Creating a 2D Polyline
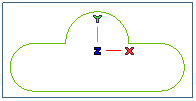
In this tutorial, you will create the following 2D profile by using the Polyline command. Open a new (*.e3)(*.e2) file and follow the steps given below.

- Enter into the 2D Profile environment and sStart the Polyline command. Make sure the Polar option is selected in the Option drop-down list of the Polyline selection list.
- Click on the start point of the polyline in the Graphics Area and move the cursor towards the positive X-direction and click on the next point to create a line segment of 70 units at 0 degree. You can make use of mini-dialog boxes to enter length and angle values.
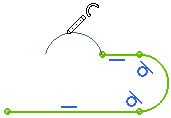
- Next, select Tangent Arc from the Mode drop-down list and create a tangent arc of radius 15 units at an angle of 180 degrees, as shown in the image below.

- Once an arc has been created the Line option gets displayed in the Mode drop-down list. Next, continue creation of one more line segment of length 20 units at an angle of 180 degrees in negative X-direction.
- Next, select 3-Point Arc from the Mode drop-down list and move the cursor towards negative X-direction and click on the second point at length of 30 units. Move the cursor upwards and click to define the third point of the arc, as shown in the image below.

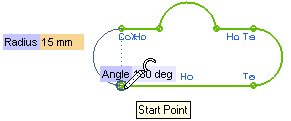
- Repeat the step 5 and then 4 to complete the tutorial. Once you reach the start point of the profile, it gets closed, as shown in the image below. Also, the command exits automatically.

Also try to....


