
Licensing System Guide for ThinkDesign 2015 and later versions
ATTENTION: For details on licenses up to ThinkDesign 2014.1, please refer to the this document.
- Introduction
- User Licenses
- Floating Licenses
- Server Installation
- Client Installation
- License update
1. Introduction
With the release of ThinkDesign 2015.2, we introduced Sentinel, a new licensing system developed by the company Thales. This also led to the standardization of node-locked licenses, dongles and network/floating licenses.
think3 License Administrator (cladmin.exe) and FlexNet licenses will no longer be used.
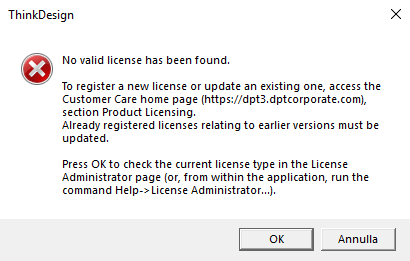
Additionally, ThinkDesign will not start in demo mode if no license is registered. After the splash screen, the program will quickly close and display the following error dialog box:
2. User Licenses
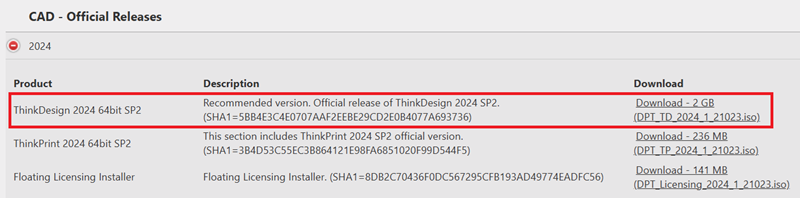
- Download ThinkDesign from the Download area of the DPTCare website.
- To extract all files from the downloaded .iso file:
a. In Windows 10 or 11, simply right-click the .iso file and select Open with Windows File Explorer.
b. In Windows 7, use the utility program 7-Zip (available online for free download).
Run as Administrator the DPT_TD_Setup.exe file located in the folder where you extracted all the files.
Follow the steps in the Setup Wizard to complete the installation.
During installation, you will be prompted to enter your Account Number. You can find this code in the top-right corner of your account on the DPTCare website.
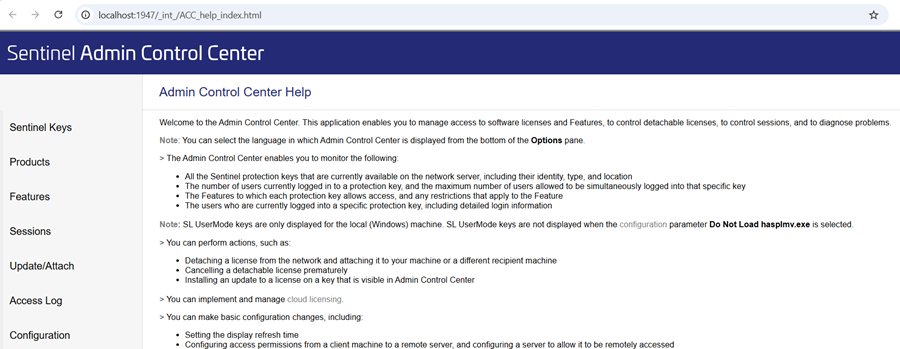
The first time you install ThinkDesign on your PC, the Sentinel Run Time Environment service will also be installed. Upon launching the program, if the "Valid license not found" error message appears, you will be redirected to the new License Administrator, called the Sentinel Admin Control Center (ACC).
If the service is correctly installed, you should see the following page.
- To request a ThinkDesign license, you must first generate the .c2v (Customer-to-Vendor) file.
a. Instructions for generating the .c2v file if your license is tied to a single PC
b. Instructions for generating the .c2v file after receiving the new dongle
a. License tied to a single PC
- If you downloaded ThinkDesign 2018 or a later version, a .c2v file will be automatically created on your Desktop during installation. The file will be named after your machine, followed by a code number (e.g., PC-John_110137.c2v).
- If you installed a prior version (2015-2017), follow these steps.
Run the executable file DPTGet.C2V.exe located in the ThinkDesign installation folder (e.g., C:\program files\think3\2016\common\utilities).
A command prompt window will appear, indicating the folder where the .c2v file has been saved, which is usually the Temp folder.
If you're having difficulty finding the .c2v file, follow these steps:
1. Click Start and select the Run command.
2. A dialog box will appear with a search bar. Type %temp% and click OK.
3. The Temp folder will open. Sort the files by "Date modified". The first file in the list will be the .c2v file you're looking for.
b. License tied to dongle (hardware key):
After installing ThinkDesign, insert the dongle into a USB port. The dongle should light up. In the Admin Control Center (ACC), select Sentinel Keys in the left-side menu. A table will appear.
In the row where the hardware key has a Driverless Configuration, select the C2V button in the Actions column.
If you haven't changed your default download location, the file will be automatically saved in your Downloads folder.

- Access the DPTCare website using the credentials provided by DPT.
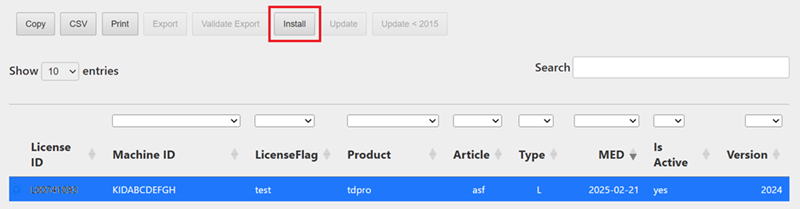
In the Licenses tab, select the row of the license you want to activate (do not click the green cross button; click the row itself), then click the Install button in the command bar.
A new tab will open (note: you may need to allow pop-ups). Follow the on-screen instructions and select the version you need.
You will then be prompted to upload the previously generated .c2v file. Once selected, click the Submit button.
- You will receive an email from DPT Licensing with a file named xxx.v2cp.
In this file name, xxx represents the license Key ID and the .v2cp extension stands for Vendor-to-Customer.
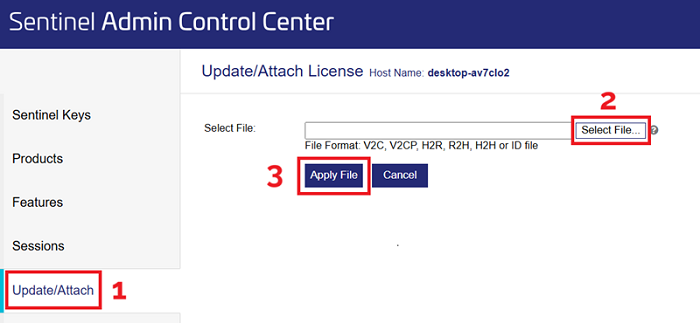
- Attach the .v2cp file in the Sentinel Admin Control Center (ACC).
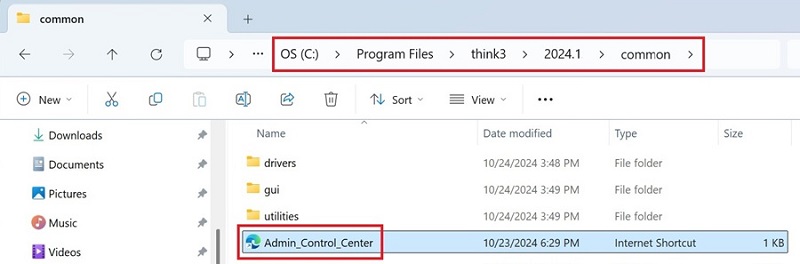
You can launch the ACC from the ThinkDesign installation folder by running the Admin_Control_Center URL (e.g., C:\program files\think3\***version***\common), or by typing http://localhost:1947 into your web browser.
In the Update/Attach section, you can upload the .v2cp file to activate the license.
After this, the license will appear in the Products section of the ACC.
3. Floating Licenses
Floating licenses are linked to a specific license server.
Server Installation
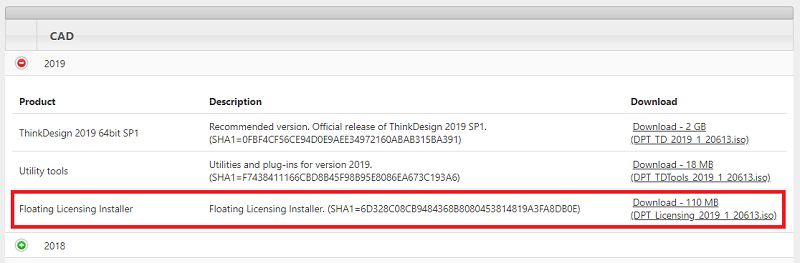
- Download the Floating Licensing Installer from the Download area of the DPTCare website.
- To extract all files from the downloaded .iso file:
a. In Windows 10 or 11, simply right-click the .iso file and select Open with Windows File Explorer.
b. In Windows 7, use the utility program 7-Zip (available online for free download).
Run as Administrator the DPT_Licensing_Setup.exe file located in the folder where you extracted all the files.
Follow the steps in the Setup Wizard to complete the installation.
During installation, you will be prompted to enter your Account Number. You can find this code in the top-right corner of your account on the DPTCare website.
- A .c2v file will be automatically created on the server's Desktop during installation. The file will be named after the server machine, followed by a code number (e.g., ServerName_110137.c2v).
- Access the DPTCare website using the credentials provided by DPT.
In the Licenses tab, select the row of the license you want to activate (do not click the green cross button; click the row itself), then click the Install button in the command bar.
A new tab will open (note: you may need to allow pop-ups). Follow the on-screen instructions and select the version you need.
You will then be prompted to upload the previously generated .c2v file. Once selected, click the Submit button.
- You will receive an email from DPT Licensing with a file named xxx.v2cp.
In this file name, xxx represents the license Key ID and the .v2cp extension stands for Vendor-to-Customer.
- Attach the .v2cp file to the Sentinel Admin Control Center (ACC) on the server.
You can launch the ACC from the Floating Licensing installation folder by running the Admin_Control_Center URL (e.g., C:\program files\think3\***version***\common), or by typing http://localhost:1947 into your web browser.
In the Update/Attach section, you can upload the .v2cp file to activate the license.
Client Installation
- Download ThinkDesign from the Download area of the DPTCare website.
- To extract all files from the downloaded .iso file:
a. In Windows 10 or 11, simply right-click the .iso file and select Open with Windows File Explorer.
b. In Windows 7, use the utility program 7-Zip (available online for free download).
Run as Administrator the DPT_TD_Setup.exe file located in the folder where you extracted all the files.
Follow the steps in the Setup Wizard to complete the installation.
During installation, you will be prompted to enter your Account Number. You can find this code in the top-right corner of your account on the DPTCare website.
- Launch ThinkDesign.
Next, you may need to set the system environment variable DPT_LIC_HOSTNAME.
Control Panel ⇨ System ⇨ Advanced System Settings
In the System Properties window, select the Advanced tab and click the Environment variables button.
In the System variables section, click the New button.
Set DPT_LIC_HOSTNAME as the Variable name, and assign its value according to the table below.
| Variable value |
Description |
| LOCALHOST |
ThinkDesign uses only local licenses, not floating licenses |
| Server_Name |
ThinkDesign uses only floating licenses |
If you use both local and floating licenses on the same PC, you do not need to define the DPT_LIC_HOSTNAME variable
If you use a VPN connection, follow these steps.
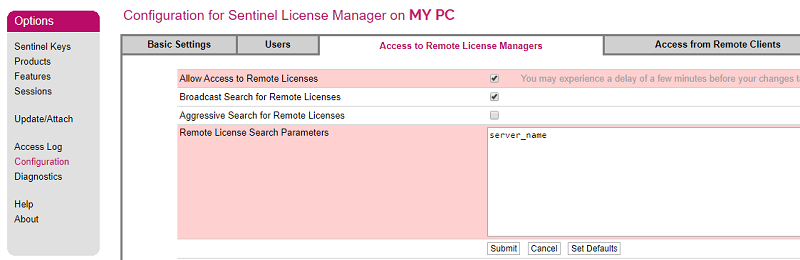
In the ACC, go to Configuration ⇨ Access to Remote License Managers and enter your server name in the Remote License Search Parameters field.
If you use a local network instead, simply set DPT_LIC_HOSTNAME = server_name.
4. License Update
When you need to update your license - whether renewing it or changing the version - go to the Licenses of the DPTCare website.
Select the row of the license you want to update (do not click the green cross button; click the row itself), then click the Update button in the command bar.
Next, follow the steps outlined above in Section 2. User Licenses, Points 5 and 6.